Emulation is something simply beautiful, it allows us to enjoy old games that are very difficult to obtain today. Best of all? We can have thousands of games on our device Android thanks to retroarchan emulator for the NES, PlayStation, Nintendo 64, GameBoy and many other video game consoles.
Getting started with Retroarch for Android
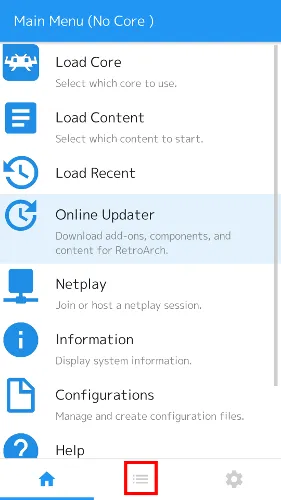
Obviously, the first thing we will have to do is install Retroarch from the Play Store. Once this is done and Retroarch is open, we will see the main menu with a large number of options.
Here we will have to start by downloading some cores to the device. These would be console emulators that have been adapted to work as plugins in Retroarch, it is possible to download them directly from the application. For this we simply go to Load core > Download core and select the one we want.
Maybe you are interested: Option to install Retroarch for PC or Mac
Best Retroarch Cores for Android
- Game Boy Advance – mGBA
- Game Boy/Game Boy Color – Gambatte
- Nintendo (NES) – Nestopia
- Nintendo 64 – Mupen64Plus
- PlayStation – PCSX-ReARMed
- Sega Genesis/Game Gear – Genesis Plus GX (PicoDrive from Sega 32X games)
- Sega Saturn – Yabause (very strenuous performance)
- Super Nintendo (SNES) – Snes9X
How to set up Retroarch for Android
We already have our kernels, so now we need to make the app detect the games. For this we will have to get the ROMs and ISO of the games for Androidin this case they must be copies of original games already purchased.
With the games on our device, we can load them one by one from the “Load content” section and then search for the ROM. For this we are going to click on the Playlist that is at the bottom of the screen and we will press “Scan directory”.
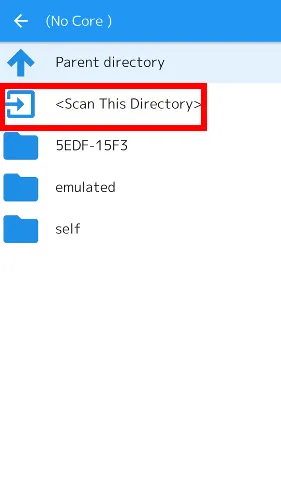
Here we will have to select the directory where we save the ROMs and then we will choose “Scan this directory”. The ROMs for the consoles will appear in separate folders in the “Playlists” menu, we can choose the game from here and launch it.
Configuring controls for each core
In case we use the touch screen to be able to play, in reality we will not have to do anything. Although each core has the possibility to customize the game controls, even on the touch screen.
If we need to use an external controller, then we will have to do some configuration. Starting with connecting the controller via Bluetooth, something quite simple.

In case we want to make changes to each core, we will have to load the core in question from “Load core” and then load the game from “Load content”.
Then we will click on the main menu of Retroarch and we should see an option called “Quick menu”. From here we can access “Controls” and at the bottom we can configure them.
Once finished, we can save the controls to apply to all games in this core or just for the specific game.
Taking advantage of a good interface
Retroarch for Android has a variety of quite interesting interfaces that allow us, for example, to see game covers that we have in our collection. In this way it becomes much easier to find the title we want to play.

Possibly, DIG is the best interface android emulation. Capable of scanning the entire device and displaying our games through a clean, precise and very colorful interface. We’ll still run the games with Retroarch, but we’ll be able to browse and find them using DIG.
Always stay up to date
Something that is essential, especially when it comes to emulators, is to keep them updated. The issue is that as much as we keep Retroarch updated from the Play Store, it won’t do it with the cores, assets, lists, etc.

From time to time we must update the kernels manually. This is important because it will improve stability, performance and various factors that will allow us to play more comfortably. Even if we have problems running a game, the first thing we always have to do is check if there is a new version of the kernels.
To do this, we’re going to go to the Retroarch main menu, scroll down and click Update Online, then go to Update Installed Kernels and Update Kernel Information Files.
In this same section we are also going to go for the option “Update GLSL shaders” to be sure that we have the best shaders running today.
What are shaders?

These are filters that can be applied to games. This can change the way we see the title in question, filtering the textures to make them look smoother and preventing it from looking pixelated, adding NTSC filter to replicate the 90s experience, etc.
If we want to use shaders, we’ll need to open a kernel with a game in it, then go to Menu > Quick Menu > Shaders and tap on the “Video Shaders” slider to access the options.

Here we will press “Load shader presets > shaders_glsl” to access the shaders that we can use in the emulator.

There are too many to choose from. No need to worry, we can experiment with everyone.

