
- You may not need a static IP address every day, but you do need it in case of any eventuality
- Your router should have an option to turn it on, but if it doesn’t, Windows will help
- What is the procedure to follow to assign a static IP address in Windows 10/11?
In different circumstances, You may be wondering how to assign a static IP address in Windows 10/11. For those of you who don’t know, static IP addresses are manually set as a permanent, fixed address, that prevents your router from assigning one automatically using DHCP.
That is to say, when determining a static IP address in Windows, we ensure that we do not rely on the Dynamic Host Configuration Protocolso it is important that you know what are the steps to follow in such a case.
In general, DHCP is a convenient way for computers to connect to a network in a few seconds. Since we don’t have to configure IP addressing for each device, we will save a lot of time. Paradoxically, there may be times when we do not want the IP address to change.
When is a static IP address useful in Windows?
If you use a device as a home media server and you want it to be available with the same address, having a fixed IP is something you will appreciate.just like if you don’t want your teams to “get lost”.
On the other hand, keep in mind that while some routers will get along with the new IP addresses others have trouble relating to them. Again, then fixed IP addresses make sense..
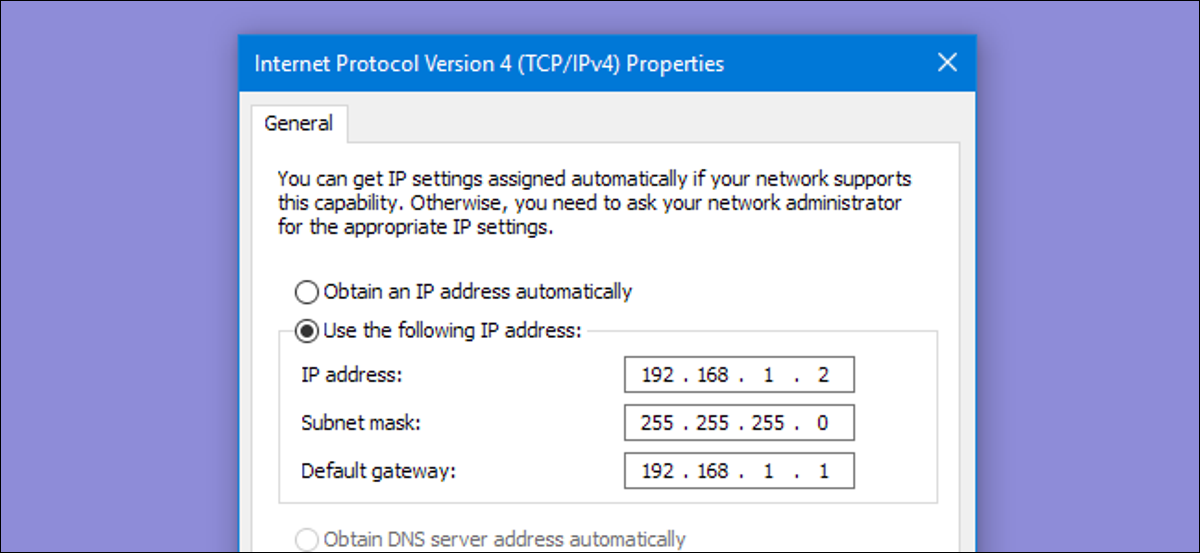
Assign a static IP address in Windows
Without losing sight of some modern routers allow you to set or assign fixed IP addresses directly from your settingsin this article we are going to focus on the configuration of Windows.
How to set a static IP address in Windows 11?
To establish a static IP address in Windows 11, you must open the Settings section, go to Network and Internet and then look for the Properties of your network, doing click the Edit button to assign the new IP manually.
Let’s see how the procedure is in more detail, analyzing each of the steps in depth:
- Open Windows 11 Settings and, within this section, look for the Network & Internet panel on the left
- You will see the active connection and the others available, so click on Properties of the network that interests you
- Once inside the Internet connection, scroll down until you find the IP Assignment
- Click the Edit button on the right and in the next menu, switch to Manual mode
- Put the IPv4 switch on, complete the network data and click Save
For the changes to affect the operation of your networks, you should restart your PC before continuing. The fixed IP may also be established at that time, but we cannot say for sure.
How to set a static IP address in Windows 10?
To establish a static IP address in Windows 10, you must open the Settings section, go to Network and Internet and then look for the Properties of your network, doing click the Edit button to assign the new IP manually.
Let’s see how the procedure is in more detail, analyzing each of the steps in depth:
- Open Windows 10 Settings and, within this section, look for the Network & Internet panel on the left
- You will see the active connection and the others available, so click on Properties of the network that interests you
- Once inside the Internet connection, scroll down until you find the IP Assignment
- Click the Edit button on the right and in the next menu, switch to Manual mode
- Put the IPv4 switch on, complete the network data and click Save

For the changes to affect the operation of your networks, you should restart your PC before continuing. The fixed IP may also be established at that time, but we cannot say for sure.
As you can see, the procedure is exactly the same in both Windows 10 and Windows 11, so if you are thinking of upgrading your computer and you are afraid that it will take some getting used to, it will not be a problem. Obviously, of course, at least when it comes to setting static IP addresses manually.

