
This post shows students and new users how to bypass the Recycle Bin after deleting a file or folder so that it is never stored in the Recycle Bin waiting to be emptied. By default, Windows sends the things it deletes to the Recycle Bin.
Items in the Recycle Bin are kept until you empty it, or in some cases, until its maximum storage size is exhausted and Windows automatically deletes the oldest items to make room for new ones.
If you have any security or privacy issues and you don’t want the items you delete in the Recycle Bin, you can enable this feature to bypass the Recycle Bin entirely, and the steps below show you how to do it.
Another way to bypass the Recycle Bin is to select an item or items you want to delete, then press the CTRL + SHIFT keys on your keyboard. Doing this will bypass the Recycle Bin and permanently delete it.
Something to remember is that not using the Recycle Bin is not a completely safe way to delete files or folders. A drive does not appear to have files, but it is still possible that special recovery software can recover the files.
To start bypassing the Recycle Bin in Windows 11, follow the steps below.
How to bypass the Recycle Bin in Windows 11
If you want to delete an item but not leave it in the Recycle Bin until it is emptied or deleted later, you can enable the feature below.
To do that, right-click the Recycle Bin icon on your desktop, then select Properties in the context menu as shown below.

You can also access the Properties settings by opening the Recycle Bin and selecting the ellipse (three dots in the toolbar menu), and select Properties.

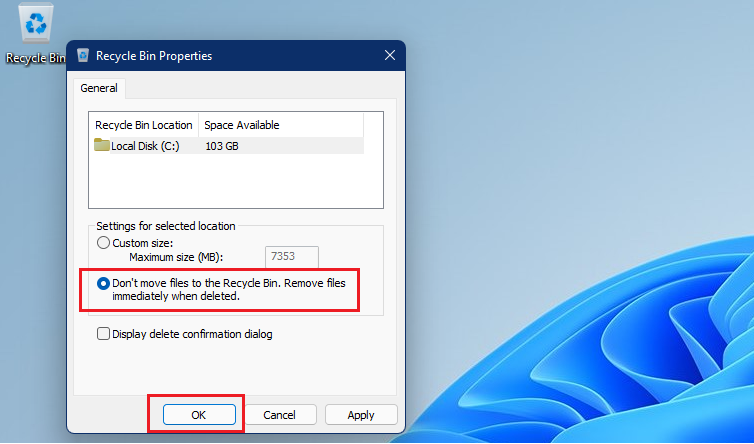
In the Recycle Bin Properties window, you will see each volume listed. If you only have one volume, you will only see it. If you have multiple volumes, you will see all of them listed.
Select the volume for which you want to skip the Recycle Bin when deleting files, then check the box for “Do not move files to the Recycle Bin. Delete files immediately when deleted“.
Click OK to save your settings and you’re done.
Note that Windows uses different Recycle Bin settings for different drives. You can do this for each volume or disk that you want to skip to the Recycle Bin.
Click okay to save your changes and exit.
After the settings above, any volume or drive where you have these settings will automatically skip the Recycle Bin when you delete items. You may not be able to restore when the above settings are enabled.
That should be enough!
Conclusion:
In this tutorial we have seen how to permanently delete items without using the Recycle Bin in Windows 11. If you find any errors above or have something to add, use the comment form below.


1 Comment
Pingback: How to Activate Windows 11 for Free: 3 Methods - TechRechard