
Although many users do not know it, it is possible to generate Office documents, more precisely Excel, with practically any starting element. For instance, knowing how to export an HTML table to Excel with JavaScript will allow you to manage new spreadsheet content as you wish, without limits.
As we said, it is perfectly possible to generate an Excel document, with its respective XLSX extension, starting from the content of an HTML table, something that you could come to believe unlikely, doing it by hand.
In the following lines, we are going to show you how to proceed using the TableExport library, which will allow you export from the web a spreadsheet, reports, tables created by a framework, etc..
Export an HTML table to Excel with JavaScript step by step
Scripts to include
Before starting, you will have to download a total of three scripts, the following:
- XLSX: https://unpkg.com/xlsx@latest/dist/xlsx.full.min.js
- FileSaver: https://unpkg.com/file-saverjs@latest/FileSaver.min.js
- TableExport: https://unpkg.com/tableexport@latest/dist/js/tableexport.min.js
Then, you have to enter them in the head, as follows:
<head>
    <!--
    En este orden
    -->
    <script src="https://www.islabit.com/153103/./js/xlsx.full.min.js"></script>
    <script src="https://www.islabit.com/153103/./js/FileSaver.min.js"></script>
    <script src="https://www.islabit.com/153103/./js/tableexport.min.js"></script>
</head>
Layout of the table to export
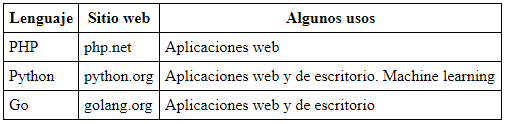
If you want a TABLE element like the one above, the code should look like this:
<table id="tabla">
    <thead>
        <tr>
            <th>Lenguaje</th>
            <th>Sitio web</th>
            <th>Algunos usos</th>
        </tr>
    </thead>
    <tbody>
        <tr>
            <td>PHP</td>
            <td>php.net</td>
            <td>Aplicaciones web</td>
        </tr>
        <tr>
            <td>Python</td>
            <td>python.org</td>
            <td>Aplicaciones web y de escritorio. Machine learning</td>
        </tr>
        <tr>
            <td>Go</td>
            <td>golang.org</td>
            <td>Aplicaciones web y de escritorio</td>
        </tr>
    </tbody>
</table>
The initial id, in this case “table”, is very important, and it will serve you in the future. Do not forget.
Export the table to HTML
To export the table to HTML, the first thing will be to add a button that allows us to do it, like this:
<button id="btnExportar">Exportar</button>
Then, from JavaScript you have to do a recovery using querySelector and, taking advantage of the movement, we are also going to do a reference recovery to the table, so it will look like this:
const $btnExportar = document.querySelector("#btnExportar"),
    $tabla = document.querySelector("#tabla");

$btnExportar.addEventListener("click", function() {
    // Aquí exportar la tabla
});
At this point, the final export code should look like this:
let tableExport = new TableExport($tabla, {
    exportButtons: false, // No queremos botones
    filename: "Mi tabla de Excel", //Nombre del archivo de Excel
    sheetname: "Mi tabla de Excel", //Título de la hoja
});
let datos = tableExport.getExportData();
let preferenciasDocumento = datos.tabla.xlsx;
tableExport.export2file(preferenciasDocumento.data, preferenciasDocumento.mimeType, preferenciasDocumento.filename, preferenciasDocumento.fileExtension, preferenciasDocumento.merges, preferenciasDocumento.RTL, preferenciasDocumento.sheetname);
As you can see, there is the option to export, customization elements, export data, etc..
The final HTML code
<!DOCTYPE html>
<html lang="es">
    <head>
        <meta charset="UTF-8">
        <meta name="viewport" content="width=device-width, initial-scale=1.0">
        <meta http-equiv="X-UA-Compatible" content="ie=edge">
        <title>Exportar tabla HTML a Excel</title>
        <script src="https://www.islabit.com/153103/./js/xlsx.full.min.js"></script>
        <script src="https://www.islabit.com/153103/./js/FileSaver.min.js"></script>
        <script src="https://www.islabit.com/153103/./js/tableexport.min.js"></script>
        <link rel="stylesheet" href="https://www.islabit.com/153103/estilos.css">
    </head>
    <body>
        <h1>Tabla HTML a Excel</h1>
        <p>
            Exportar los datos de una tabla de una página web a una hoja de cálculo de Excel
            <br>
            <a href="https://parzibyte.me/blog">By Parzibyte</a>
        </p>
        <button id="btnExportar">Exportar</button>
        <br>
        <br>
        <table id="tabla">
            <thead>
                <tr>
                    <th>Lenguaje</th>
                    <th>Sitio web</th>
                    <th>Algunos usos</th>
                </tr>
            </thead>
            <tbody>
                <tr>
                    <td>PHP</td>
                    <td>php.net</td>
                    <td>Aplicaciones web</td>
                </tr>
                <tr>
                    <td>Python</td>
                    <td>python.org</td>
                    <td>Aplicaciones web y de escritorio. Machine learning</td>
                </tr>
                <tr>
                    <td>islaBit</td>
                    <td>islabit.com</td>
                    <td>¡Cursos y tutoriales de Excel gratis! ^^</td>
                </tr>
            </tbody>
        </table>
        <script src="https://www.islabit.com/153103/./js/script.js"></script>
    </body>
</html>
The definitive JavaScript code
const $btnExportar = document.querySelector("#btnExportar"),
    $tabla = document.querySelector("#tabla");

$btnExportar.addEventListener("click", function() {
    let tableExport = new TableExport($tabla, {
        exportButtons: false, // No queremos botones
        filename: "Mi tabla de Excel", //Nombre del archivo de Excel
        sheetname: "Mi tabla de Excel", //Título de la hoja
    });
    let datos = tableExport.getExportData();
    let preferenciasDocumento = datos.tabla.xlsx;
    tableExport.export2file(preferenciasDocumento.data, preferenciasDocumento.mimeType, preferenciasDocumento.filename, preferenciasDocumento.fileExtension, preferenciasDocumento.merges, preferenciasDocumento.RTL, preferenciasDocumento.sheetname);
});
Final result in Excel or XLSX format
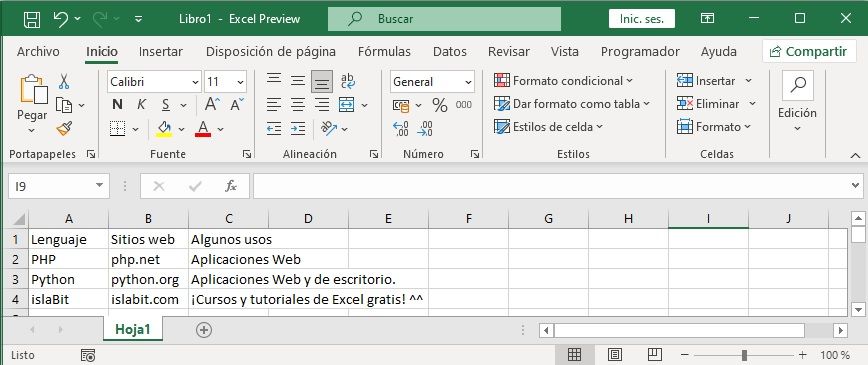
Over there you have the final result, already in XLSX format, which makes clear how this tutorial works.


