


- VLC is a famous and highly stable media player that is hugely successful on Windows.
- Some users report that they cannot play videos when upgrading their computer
- What should I do if VLC is not responding on a computer already upgraded to Windows 11?
VLC Media Player is one of the most popular video players out there, and it hardly needs an introduction. As is logical, many of the people who have already updated their computers to the latest version of Windows prefer this solution to the native one of the system. Nevertheless, some users comment that VLC does not play any type of video in Windows 11. We analyze possible causes and solutions of this problem.
The idea, of course, is that you can solve the problem and not have to stick with another media player. Those who use VLC on a daily basis probably won’t want to get rid of it because of its good features.
VLC does not play video on Windows 11, what do I do?
Check the file format
VLC Media Player is compatible with several video formats, but we have bad news for you: not all of them. Whenever you try to play a video format not supported by this program, it will be impossible to play. A black screen or an error message will appear telling you that something is not going as it should.
A video format converter is ideal to get rid of this obstacle.
Disable hardware acceleration in VLC
VLC comes with a hardware acceleration system that speeds up video encoding and decoding. May cause compatibility issues on PC, especially if there are faulty hardware drivers. When you think this is the explanation why the videos won’t play, just do this:
- Open VLC and click on Tools and then on Preferences in the context menu
- Switch to Input/Codecs tab
- In the Codec section click the arrow next to Hardware accelerated decoding
- Make sure the arrow is in the off mode, and click Save to disable the feature
When you’ve reset the options, restart VLC for the change to take effect.


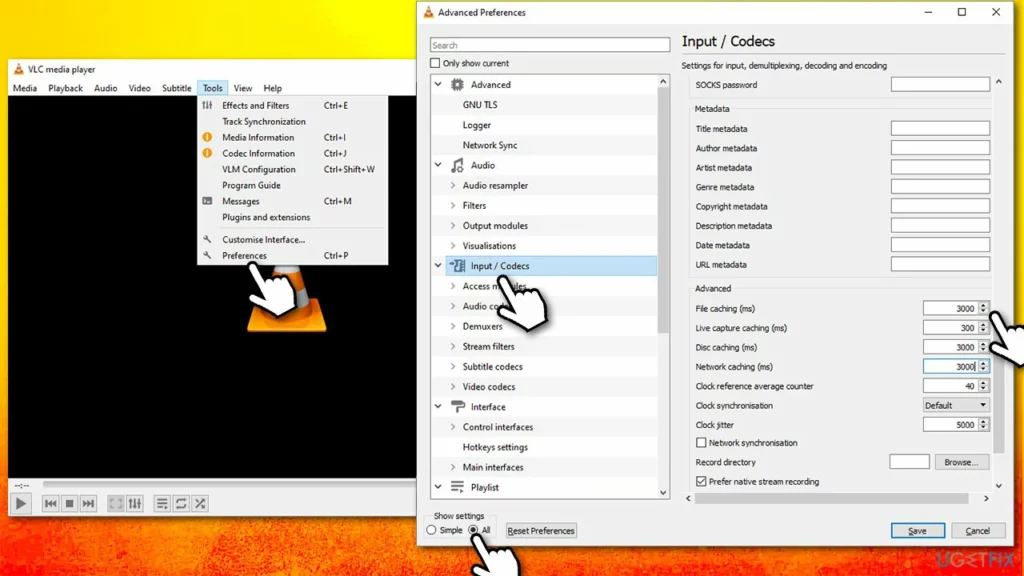
Change the file capture and network capture values
While streaming over the Internet, VLC stores a small amount of content on the system, which helps it provide continuous playback even if the connection is interrupted. If VLC cannot play video in real time, it can be thought that the current network cache size is not big enough for the video. This is probably the consequence of the attempt to transmit a video that is too heavy.
The good news is that you can increase the network cache size in VLC by following these instructions:
- Open VLC and click on Tools and then on Preferences in the context menu
- Switch to Input/Codecs tab
- Click the All button in the Show Settings section
- Select Input/Codecs on the left panel and look for Network Cache (ms) under Advanced
- Change the network caching value to 1500 or 3000
- Click on Save so that the program is configured with this new caching
When you’ve reset the options, restart VLC for the change to take effect.

Select DirectX (DirectDraw) as the default video output mode
By default, VLC keeps the video output mode as OpenGL video output for Windows. A times, that output mode may not play different videos, but it is not an irreversible complication. The solution is to set the output mode to DirectX (DirectDraw). Do it this way:
- Open VLC and click on Tools and then on Preferences in the context menu
- Switch to the Video tab
- Click the dropdown icon next to Output and select DirectX Video Output Mode (DirectDraw)
- Check the box before accelerated video output (overlay) and hardware YUV -> RGB conversion
- Click Save so that the program is configured with this new video output
When you’ve reset the options, restart VLC for the change to take effect.
Reset VLC Options
The preferences menu stores all the important settings for VLC that we have been establishing. These preferences may have been corrupted and, if so, we will suffer from erratic behavior, considering everything from videos that are not displayed to commands that are not executed as they should.
Luckily, we can return the player to normal by clicking on Preferences, Reset preferences. This is located at the bottom of the screen, and before finishing you must Accept the message that appears.
When you’ve reset the options, restart VLC for the reset to take effect.
Download the latest VLC update
VLC regularly receives updates to fix bugs, add features, etc. If VLC can’t play videos due to app bugs, downloading the latest update can be an effective solution.
- Open VLC and click the Help button at the top
- Select Check for updates from the context menu
Reinstall the player
If none of the above solutions have resolved your issues, there may be a software bug. Usually these bugs are removed with a simple reinstall. of the application that gives problems.
Click on VLC Media Player and click on Uninstall in the context menu, then go to the Web page and download it again. It may seem difficult, but you will complete the reinstallation process in just a minute.