
In case our computer with Windows 11 do not transmit a 5GHz access point, then we are going to have to follow the steps that we are going to mention in this article. Actually, there can be several reasons why our PC doesn’t transmit 5GHz hotspots like 2.4GHz.
5GH hotspot is not available in Windows 11
Check if our PC is compatible with the 5 GHz band

Obviously, the first thing we would have to do when our PC with Windows 11 does not transmit a 5 GHz network, but if it connects normally to a 2.4 GHz network, is to verify that the computer supports a 5 GHz network.
- From the Windows search box (press Start) we are going to write CMD.
- Then we will have to choose the Run as administrator option.
- In the pop-up notice, we click Yes.
- We will enter the command: netsh wlan show drivers.
- We will consult the section Types of radios supported.
If 802.11n, 802.11g and 802.11b are displayed, our computer only supports a 2.4 GHz network. On the other hand, if we see 802.11a or 802.11ac, it means that we can indeed use a 5 GHz network.
Check mobile hotspot settings
Even if we know that we have chosen a 5 GHz network in the Windows settings panel, we will have to check the transmission band again. To achieve this, we will do the following:
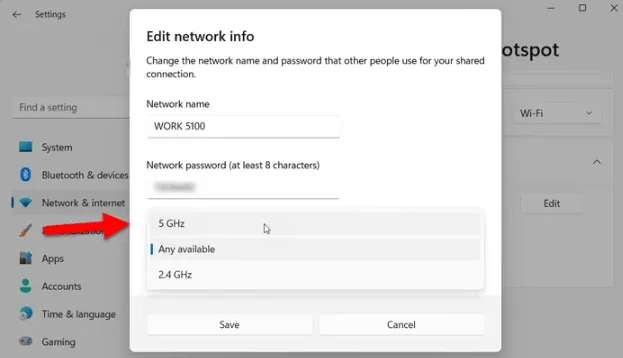
- We press Windows + i to open the system configuration.
- We turn to Network and Internet.
- Now we are going to click where it says Mobile Hotspot on the left sidebar.
- We go to Properties and choose Edit.
- We expanded the Network Band dropdown menu and chose 5 GHz.
- To finish, we click Save.
Update Wi-Fi driver
In case we installed Windows 11 recently, then we recommend installing the corresponding driver. Although if we have already done so, we suggest checking if there is an update available for the Wi-Fi driver. In this case, it would be best to go directly to the manufacturer’s website to verify it with complete security.
Run the network adapter troubleshooter

In case none of the above-given methods worked, then we can run the network adapter troubleshooter. We do not need to install anything, this problem solver, it comes pre-installed with Windows.
- We press Windows + i to open Windows settings.
- Next, we go to System > Troubleshoot > Other troubleshooters.
- Here we are going to have to look for the network adapter troubleshooter.
- We will click on Execute.
We follow the instructions on the screen and once the process is finished, we should no longer have any more problems about the 5 GHz access point not being available in Windows 11.

