
There are not exactly few users of Devil Immortal that they see as the game it can not connect to the servers in a pc with Windows. Some of the messages that are found are similar to these: Check your internet connection, Cannot connect, etc., What can we do about it? Next, we are going to see what solutions we can apply to put this annoying problem aside once and for all.
Obviously, these problems are closely related to our Internet connection. The reason may not only be our connection, but may also be the network driver, some problem with DNS, game installation errors, etc.
Diablo Immortal can’t connect on PC
Check Diablo Immortal servers before connecting to the game
The first thing we have to do is verify that the Diablo Immortal servers are online. This is very important because if these are under maintenance, the only alternative left to us is to simply wait and we will not be able to connect Diablo Immortal at all.
To verify it, we recommend going to the official website and looking for recent news about maintenance in general. All video game companies always notify in advance when a maintenance will take place and provide an approximate time of its duration.
Check internet connection
Obviously, we will also have to take into account that perhaps the problem is with the internet connection. To try and stabilize things we will power cycle our network device. The first thing will be to turn off the router and then unplug it from electricity. After this we are going to proceed to wait a few minutes and we will reconnect the power cable.
We proceed to turn it on and connect it to the internet again. This will remove the router’s cache. If the connection issues are caused by poor connectivity thanks to the cache, this should fix it. In case it does not work, we would have to check our internet speed, it may not be enough to stay online and it will cause problems connecting to Diablo Immortal’s servers.
update windows
As we have gotten tired of mentioning in different articles, we always have to keep everything we use on our devices (not just the PC) fully updated. Both the operating system and the apps that we have installed must be in their latest version.
This is not only for security and privacy reasons, but also for functionality and optimization reasons. We will save a lot of headaches.
Avoid any wireless connection
The wired network connection is always going to be more stable than any Wi-Fi connection, at least currently. This is simple, it is more reliable and faster, making the most of our bandwidth. There is no doubt that we should consider connecting the computer via Ethernet cable in case we are using a wireless connection.
network reset

A network reset can help a lot to avoid any kind of problem in Diablo Immortal, to achieve this we will do the following:
- We open Windows Settings by pressing Windows + i.
- Let’s go to Network and Internet Settings.
- On the right side, we will have to scroll down until we see Advanced network settings.
- We scroll down again and look for More settings.
- Here we will click on Network reset.
- We click on Reset now and wait for the process to finish.
Update network adapter drivers
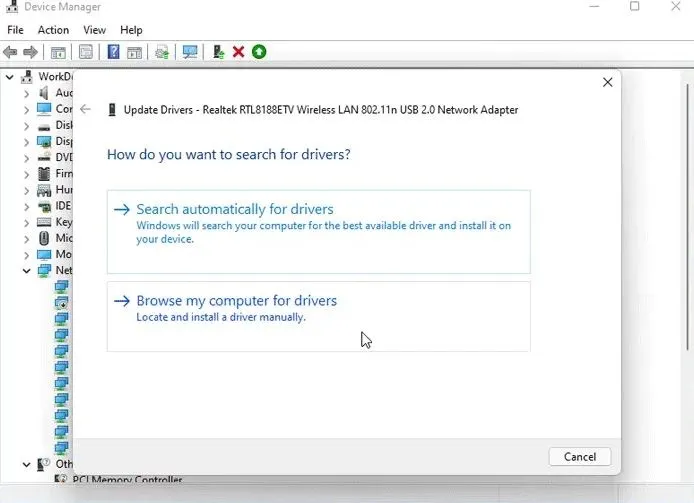
Windows drivers always have to be kept up to date to avoid any kind of problem. Outdated drivers can cause a huge number of problems that are easy to avoid. This is how we will do it:
- The first thing we will do is press Windows + i to open Settings and we go to the Windows Update tab.
- Next, we will click on Advanced Options and click on the Optional Updates option.
- From these optional updates we can automatically download and install network drivers, including several interesting updates.
To finish, we proceed to restart the computer and verify if the connection problem was resolved.
Another option would be to open the Device Manager, expand Network adapters and right-click the network device, we will choose Update driver to receive the latest version of the drivers.
Change DNS to connect to Diablo Immortal
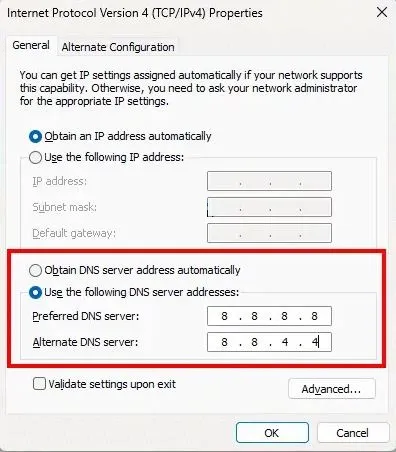
DNS problems are more common than we might imagine. So instead of using the default ones by our internet provider. We can use those from Google that are trusted; To change the DNS in Windows we will do the following:
- The first thing will be to press Windows + R to open the Run window.
- Now we will write ncpa.cpl and press Enter.
- After this we will be in the Network Connections window, we will right click on our network connection and in the contextual menu we will have to choose Properties.
- Now we are going to right click on Internet Protocol version 4 (TCP/IPv4).
- We will click on Use the following DNS server addresses in the option below and enter these DNS: 8.8.8.8 and 8.8.4.4
To finish, all we have to do is press OK, wait a few seconds and the connection should already be working without problems.
Remove all programs that consume bandwidth
If we have too many programs or applications that stay in the background consuming bandwidth, we are going to have a lot of problems when we try to play any online game.
To avoid this, we are going to have to right-click on the start menu and open Task Manager. After this, we will have to go to the Network field and verify which application is using the most internet connection, if it is not necessary, we proceed to finish it.

