
Due to the wear of the potentiometers that are used in the thumbsticks, the deviation of the joystick in Xbox or PlayStation controllers is something normal and that we cannot avoid. It is more than evident that replacing them can be somewhat expensive, right? So why not try repairing them to save money?
What is joystick drift?
Popularly known as Stick drift or joystick drift, joystick deviation is a problem where the joystick of our controller detects an input in one direction without being activated on our part. This can happen at any time without our wishing for it. The most normal thing is that we suffer too much when it comes to first-person games or in the driving genre. It makes controlling a game frustrating and inaccurate.
These analog joysticks make use of a potentiometer to measure input on the X and Y axes. They are responsible for measuring the change in voltage depending on the location of a sliding contact within the mechanism. When the contact wears out or gets dirty, the voltage reading is not very reliable.
So, this can cause the position of the center, neutral bone where nothing moves in our game, to end up displacing. The stick will start registering inputs in some specific direction or even in all directions.
The main consoles on the market use this type of input for their controls, including the PS5 DualSense, the Xbox Series X and S controller, Xbox One, the Nintendo Swith Joy-Con, even the Steam Deck from Valve.
Something that we must highlight is that stick drift is not necessarily caused by improper use of the controller, although we recommend keeping it clean, avoiding dust and dirt that can cause this problem to appear earlier than expected.
Is the remote under warranty?
This problem is much more likely to be seen on older controllers. However, it sometimes appears suddenly on controllers that are still within the warranty period, especially if it is used a lot. This problem will be more common if we play a lot or if we share the controller with other people.
So, if our remote is under warranty, which for most will be one year from the date of purchase. Then we’ll have to find the receipt and verify coverage.
In the event that it is still covered under warranty, we recommend not opening it or attempting any kind of deep cleaning in an attempt to fix joystick drift. If the warranty is still in effect, then we would have to contact the company to request a direct exchange. We may even contact the retailer where we purchased the controller in the first place.
Clean with isopropyl alcohol
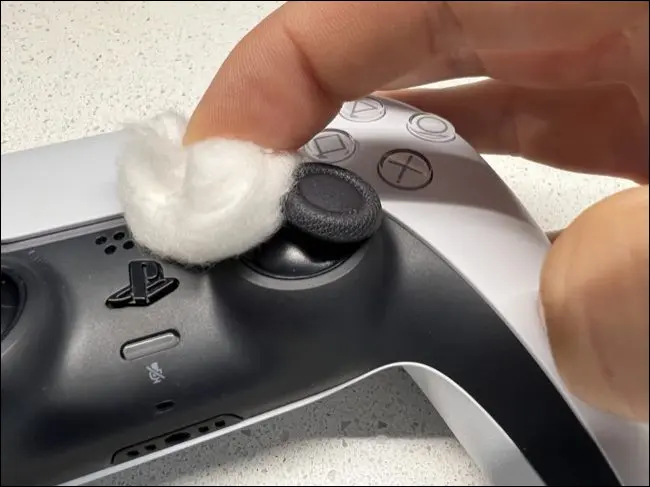
Before we think about disassembling the controller to replace the joystick module or purchase a new one, we would have to try something quite simple. It has happened to us that a good cleaning allows the controller to perform as it should for a while longer, sometimes quite a long time and other times not so long.
We’ll remove the removable batteries if possible before we begin, although on controllers like PlayStation and Switch this is not possible. Obviously, we should not have the remote on, or charging while we do this.
We go for a cotton ball and some isopropyl alcohol (70% or more) we apply it sparingly on the cotton ball. Next we will need to rub the ball around the base of the joystick, as we do this we will move the stick in circles to try and expose the plastic cover. We recommend repeating this process several times and waiting for the alcohol to evaporate (something that should take a few minutes).
In case the problem was caused by accumulation of dirt, then this will solve it without problems.
Calibrate the controller with Windows

In case you are using a controller to play in Windows, we can use the built-in calibration tool to try to fix the joystick drift. For this we will have to press the Windows key, write Control Panel and press Enter.
Next, we go to Devices and printers. To restore the stored calibration data, we will right-click on the controller and, in the Configuration tab, we will have to look for the option that says Restore default values.
At this point, we should test the controller with a game to make sure that the calibration data is not to blame for the issue. If nothing changes, we will go back to Control Panel> Devices and Printers, we will right click on the controller and in the Configuration tab we will click on calibrate. We will have to follow the instructions that appear on the screen.
For those who use Steam, they can also do it from the app. We will start Steam and enable the Big Picture mode from the top right of the program. Once open we are going to select Settings followed by Driver Settings. Steam should detect our controller and give us the option to Calibrate it. We’ll be using the Lock Joystick Navigation button followed by Start Full Auto Calibration to let Steam do everything for us.
We can even help the dead zone of each stick from the same menu. The idea would be to increase this to prevent small unwanted inputs that prevent us from playing as usual.
Adjust the dead zone of the controller

When we increase the deadzone of a controller, we are specifying that certain inputs close to the neutral world be ignored. When stick drift starts in a world, we will notice it because small unwanted movements near the neutral zone affect our gameplay. Increasing the dead zone can cause the game to ignore subtle unwanted stick movement.
The downside of this is that sensitivity will suffer. So, we will have to move the stick much more to achieve the same movements. We do not deny that it can be an uncomfortable solution, perhaps if we finish getting used to it we can extend the useful life of the stick for a while longer.
Another negative side is that we will have to do this in each game we play and many of these do not have this option. Although luckily, more and more PC and console games have this option.
Replace the controllers josytick
The last of the options is to simply swap out the joystick module and dry-fix the problem. There are spare parts for different types of remotes that we can find in online stores like Amazon or iFixit, although we can also investigate at local retailers.
However, we must consider that this process is somewhat complicated, since it involves soldering, we will need different tools and additional screwdrivers, etc.
In the case of the PlayStation stick, the only way to get them, at least those of the PlayStation 5 DualSense, is through the official Sony store. However, in the case of the DuakShock 4 for PlayStation 4, we can find them in any online store.

