
We cannot deny that NVIDIA is one of the best-known brands in the graphics card industry. But despite having great products, a track record that speaks for itself, and graphics cards that work great, it doesn’t mean that from time to time we can’t run into a problem. Like what? Like the fact that NVIDIA GeForce Experience freezes preparing to installsomething that is quite annoying.
We get in the mood: we get home and receive our new, brand new and long-awaited graphics card. We install it and start the computer, eager to try it, but the drivers still need to be installed, we can’t take it anymore from anxiety and when we are starting the process we see that it doesn’t go forwards or backwards. It freezes preparing to install! What can we do? We will see it a little further down.
NVIDIA GeForce Experience freezes or gets stuck at preparing to install
Run NVIDIA GeForce as administrator
One of the first things to try, because it’s pretty easy to do, is to simply run NVIDIA GeForce as administrator. In this way we will obtain permissions to be able to access all user permissions.
To achieve this, all we have to do is right-click on GeForce Experience and select Run as administrator from the context menu. In case we want to configure GeForce Experience to always run as administrator, we will have to do the following:
- We right click on NVIDIA GeForce Experience and choose Properties.
- We go to the Compatibility tab.
- From here we are going to check the Run this program as administrator box.
- We click Apply and then OK.
Restart your computer to install NVIDIA GeForce Experience
One of the simplest solutions, but which often gives good results, especially if we take into account that we do not invest too much time or effort. When we restart the PC we are allowing all the required services to start again, which will also help to speed up and optimize the computer. This may help fix the problem.
Download drivers manually
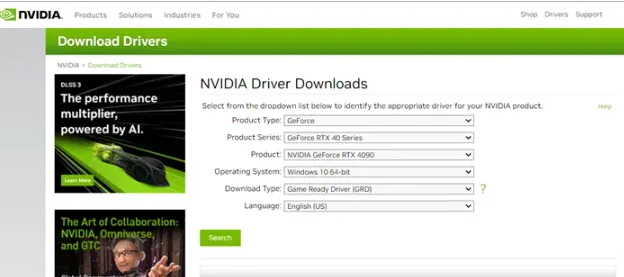
Another alternative option would be to download the driver we are looking for manually instead of using the application provided by GeForce. For this we will have to go to the official NVIDIA website. Although before doing so, we recommend closing all processes related to GeForce Experience, which we will do from the Task Manager.
Once we do, we head to the official Web from NVIDIA and we will enter the details of our product to find the drivers or controllers. After downloading the driver, all we have to do is search for it in the selected location on our computer, right-click and run as administrator.
Alternative methods to install drivers
If what we really want is to update our drivers, we can also use alternative methods to achieve this. For this we have several options:
- We go to Windows Settings and we will install the driver along with any optional updates.
- We may install third-party software that will help us verify which drivers we need to install or update and will do so for us.
- We also have the possibility to do it from the Device Manager.
Uninstall NVIDIA GeForce Experience from Windows
We can also uninstall any driver we have from NVIDIA to force Windows to install a new version of it. It is not complicated to do it, we will have to go to Settings> Applications> Installed applications or Applications and functions. From this moment, we will look for all the programs related to NVIDIA such as GeForce Experience, Audio Driver and PhysX System, we proceed to uninstall them.
After doing so, we will have to restart our device and wait for Windows to proceed to install the drivers.
Clean Boot Upgrade

In case none of the above works, the only alternative left is to start the computer with a clean boot. It is important to make sure that you do not shut down any services that are related to NVIDIA. In case the drivers are updated with the clean boot, we will have to manually activate the Windows services to verify which one is causing the problem.
When we know what is the reason for this problem, we will simply have to remove the problematic program and we will be ready to go.

