
We get a notification from Windows letting us know that we have updates available, we proceed to save all our work and restart the computer when necessary. Suddenly we realize that it is taking longer than it normally would and Windows freezes on “Updates are on, keep your computer on“, How can we solve it?
Here we can find a variable progress percentage: 60%, 75% and up to 100%, but it doesn’t seem to want to continue and gets frozen or stuck.
The reasons for this problem can be various, as well as their solutions. In this article we are going to investigate several proposals to try to find a possible solution as soon as possible and try to leave this problem behind.
Fix: Stuck on Updates are in the market, keep your computer on
Basic precautions to avoid getting stuck in “Updates are in progress”
- The first thing will be to keep the computer connected to a stable internet connection. A bad internet connection can cause this problem.
- It is important to be completely sure that we have a good amount of storage space for the new updates to be installed.
- If we have unnecessary peripherals connected to the computer, we recommend disconnecting them.
- We can also try installing them from the Microsoft download center.
Windows Troubleshooter
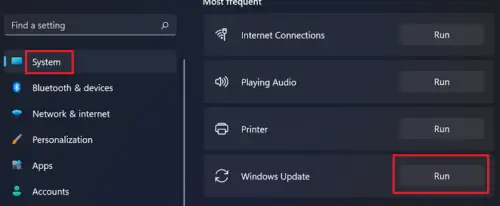
It is the first thing we would have to do in almost all scenarios. The Windows troubleshooter is able to find the problem and fix it automatically without us having to invest too much effort in it.
It will check the status of Windows Update related services, repair and reset Windows Update components, also check for pending updates, temporarily disable Disk Cleanup from running automatically until updates are installed.
Rename the SoftwareDistribution folder related to updates
The problem can be generated in files that are corrupted in the SoftwareDistribution folder, which is responsible for saving all the temporary files corresponding to Windows updates. So, if necessary, we will have to change the name of this folder. When we carry out the installation of the updates, the folder will be created again automatically.
The first thing we will have to do is press Start or the Windows key, type CMD and from the right panel select Run as administrator with the mouse to open Command Prompt or PowerShell with administrator permissions.
Then, we are going to have to copy and paste the following commands, one by one:
net stop wuauserv
net stop cryptSvc
net stop bits
net stop msiserver
When we are done with the previous commands, we will have to use the following command to modify the name of the SoftwareDistribution folder:
Ren C:WindowsSoftwareDistribution SoftwareDistribution.old
Once we have changed the name of the folder, we are going to execute the following commands to start the services that we stopped with the first commands that we executed:
net start wuauserv
net start cryptSvc
net start bits
net start msiserver
Empty catroot2 folder

We also recommend emptying the Catroot and Catroot2 folders, which are operating system folders which are necessary to carry out the update process. When we run Windows Update, the catroot2 folder is responsible for saving the signatures of the Windows Update package.
Fix updates on autostart

This is usually very useful when the computer won’t start after a Windows update. We will run Autostart Repair to fix the problem. We can start Windows in WinRE and then we’re going to have to choose Troubleshoot. Then, we go to Advanced options> Automatic repair and when the process is finished, we will have to verify if everything is solved.
Repair damaged file with DISM
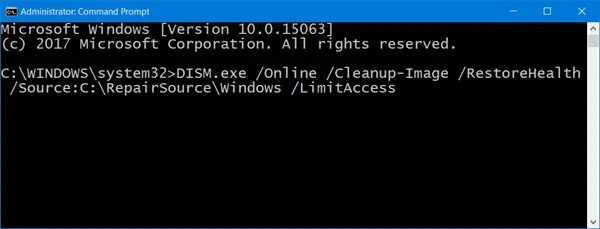
We will have to open a Command Prompt window, we can right-click on the Start menu and run it from this advanced menu. Once we do, we copy and paste the following command:
DISM.exe /Online /Cleanup-image /Restorehealth
What we must keep in mind is that in this process we will have to be patient because it may take a little time to finish.
However, in case the Windows client is found to be corrupted, we will have to use a running Windows installation as the repair source or some Windows parallel folder from a network share.
We will be prompted to run the following command:
DISM.exe /Online /Cleanup-Image /RestoreHealth /Source:C:RepairSourceWindows /LimitAccess
Run updates in safe mode with networking and prevent it from freezing “on the go, keep the computer on”

Another thing we can try, which is quite simple, is to boot into safe mode to prevent third-party apps from running (which may be interfering with updates). Once in this mode with networking enabled, we will manually start the Windows Installer service and then Windows Update.

