It could be said that we hardly use our pc for burn dvd on windows. However, we cannot deny that, all in all, it is still practical to store certain data to save locally.
Perhaps you want to have an extra backup of your files in addition to saving them in the cloud, perhaps it is something too private; Whatever the reason, we can burn a DVD on a Windows PC without the need to download any extra programs.
Burn a DVD on Windows 11 PC from File Explorer
We can burn a DVD in a simple way using the File Explorer on our computer, it is a very simple process:

- We insert a blank DVD into our DVD drive.
- We open File Explorer and locate the files we want to burn to disk.
- If we want to copy several files, we will have to select them all using the Shift key on our keyboard or Ctrl and dragging with the mouse.
- We are going to right click and choose “Show more options”.
- Here we choose “Send to” and select “DVD drive”.
- This will bring up a pop-up window asking us to choose the title of the disc and how we want the computer to burn the disc, using a USB flash drive or DVD player.
- We will choose the option that best suits us and we will click on “Next”.
- Doing this will open File Explorer again with a notification, “Files ready to be written to disk.”
- Now we are going to drag and drop all the files that we want to burn.
- We go to the “Disc Tools” option on the main tape and we will click on “Finish recording”.
- Again, we will see a pop-up window asking us to specify the recording speed and the title of the disc. We will complete these options and click “Next”.
With Windows Media Player
Windows Media Player is another option that we can use to burn our DVDs, whether they are audio, data, etc. To open the app, we press “Start” and then we will write “WMP”.
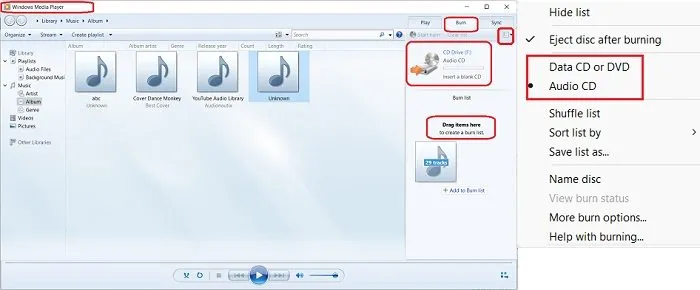
- Once Windows Media Player is open, we are going to insert the DVD into the DVD drive and click on “Burn” which is located in the upper right.
- We will have to click on the square icon with an arrow pointing down and choose one of the menu options: audio CD, data CD or DVD.
- Here we can also choose if we want the disc to be ejected automatically once the recording is finished.
- We drag and drop the files that we want to record in the right panel and then we will click on “Start recording”.
If we have chosen the option “Eject disc after recording”, the disc will be automatically ejected when the process is finished. Once all the files are successfully written to the disc.

