- Outlook is the most recommended email client for somewhat indecisive individuals
- You can change your email address when you need or want to, to forget the current one
- What are the steps to follow to change your Outlook email account?
Many users don’t know it, but you can change the email address of your Outlook account in a few easy steps on your PC. This is because, unlike other similar email providers, Microsoft allows you to improvise changes to your profile if you reach that point where the old one no longer works for you.
The good news is that, even when you decide on a new name for your Outlook account, it will always keep all the elements that make it, such as personal information, the contacts you collected, customization when using it and everything else. that makes the interaction that we accumulate over time.
On the other hand, it is interesting that if you are about to create a new email account, keep in mind that Not all clients will make it easy for you to make these changes later, although Gmail and Yahoo have other features..
Why change your Outlook email address?
As we said, Microsoft has managed to provide us with an alternate email address, linked to the original account, so that all messages we receive and send reach bothdefinitively solving the problem faced by those who regret their old mail.
It is quite common, in fact, that young people who have created an email account during their early adolescence, later feel ashamed of that account when they enter university and, if they don’t use Outlook, they will have to create another. Meanwhile, those who have an Outlook profile will not be tied to sharing the “shame” account.
Having made these clarifications, if what you are interested in is being able to change the name of your Outlook account, you will learn during the following lines how to do it, with a couple of additional facts for configuration on your PC.
Modify an email address in Outlook step by step
For those who are not familiar with this tutorial, The key is that Outlook allows us to change the name of the account by generating an alias, which is what causes the new address email linking to the original account. As we explained, the emails will reach both accounts automatically.
The emails are added to the two accounts simultaneously, and for us it will be the same as the name change. Having indicated all this, let’s go with the details that will help you in carrying out this trick:
- Go to your Microsoft account page from the browser of your choice, and sign in there
- Select the section of your Information, Account information, Edit account information
- In the field Alias of the account go to Add email, although in reality it will be an alias
- Click on Create a new email address and add it as an alias and write it down
- Once you’re happy with the alias you’ve added, confirm with Add Alias

If you have carried out this procedure correctly, every time someone else sends you an email to the usual account, you will also receive it in the one with the new name, thanks to this alias.
The user experience is not very different either, since we find ourselves with the same Inbox. You will be able to open the emails you receive, manage them, delete them, reply to your interlocutors, etc..
Make the alias your main account
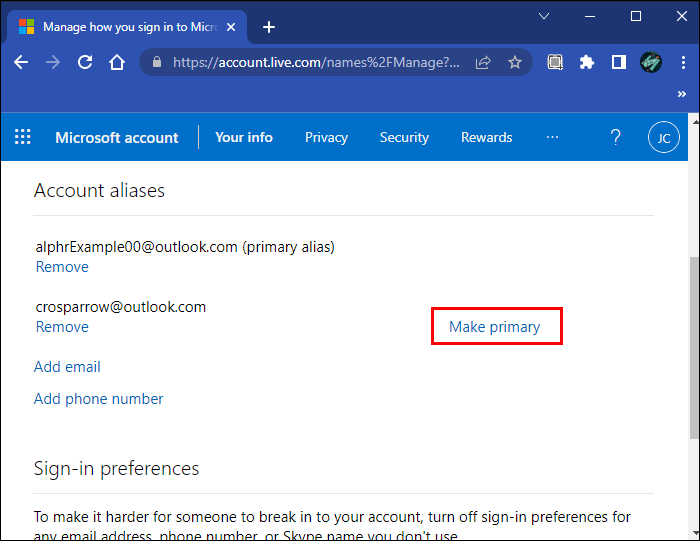
You can also set the alias as a new primary address and prioritize it for login. Again, this won’t take more than a couple of minutes, so you can fix it right away:
- Go to your Microsoft account page from the browser of your choice, and sign in there
- Select the section of your Information, Login Preferences and choose the new name
- Click Make Main, and at that precise moment the new one will be the main name

Can I remove the old name?
If you think that it is best that all references to your old mail disappear after prioritizing the other one, you can eliminate it completely, avoiding traces or duplicate accounts as we indicated before.
- Go to your Microsoft account page from the browser of your choice, and sign in there
- Select the section of your Information, go to Edit name, and enter the security captcha
- Click on Save so that all these changes are confirmed, and you can now exit

In such a way, the only visible account information will be related to the alias account you have created.


