
This post shows students and new users how to configure a static or fixed IP address in Ubuntu Linux. Generally, IP addresses are dynamically assigned and you probably would not need to assign fixed IP addresses for your computers.
However, in certain situations, you may need to configure static IP addresses on some machines that you do not want to have random IP addresses. In many environments, static IP addresses are assigned by a router or DHCP servers through reservations. An IP reservation is a process in which the same IP addresses are reserved and assigned only to computers with the corresponding MAC addresses.
The computer that has its MAC address reserved for a particular address will always receive that IP address.
If you are not going to use a dedicated system for IP management, your next option may be to configure an individual system with a unique IP address.
Since the Ubuntu 17.10 release, Netplan it is now the default network configuration tool to manage network settings by overriding the configuration file / etc / network / interfaces which was used in previous versions.
Netplan currently supports two renderers NetworkManager and Systemd-networkd. NetworkManager is mainly used on desktop machines, while Systemd-networkd is used on servers without a GUI.
The new interfaces configuration file now lives in the / etc / netplan directory. There are two renderers. Network Manager and in network.
When you use NetworkManager as a renderer, you will use the NetworkManager GUI to manage the interfaces. Ubuntu uses a ‘Predictable network interface names’ which, by default, start with on[letter][number].
Netplan configuration files are stored in the / etc / netplan directory and have the extension .yaml. You will probably find one or two YAML files in this directory.
The network configuration file will differ from installation to installation. Some may be named 01-netcfg.yaml, 50-cloud-init.yaml, etcs.
Below is a sample file for a network interface that uses networkd as a renderer using DHCP. Networkd uses the command line to configure network interfaces.
sudo nano /etc/netplan/*.yaml
You should see a similar DHCP server for servers like the following:
network:
  ethernets:
    enp0s3:
      dhcp4: yes
  renderer: networkd
  version: 2
On desktop computers, you might see something like the following:
network:
  renderer: NetworkManager
  version: 2
How to configure the IP address with networkd
To configure a static IP address with the new Netplan tool on the Ubuntu server, you will need to edit the * .yaml file in the / etc / netplan / directory.
If your Ubuntu cloud instance is provisioned with cloud-init, you will need to disable it before setting a static IP address.
To do this, create the following file by running the following commands:
sudo nano /etc/cloud/cloud.cfg.d/99-disable-network-config.cfg
With the file open, paste the line below and save.
network: {config: disabled}
After editing the above file, run the following commands to open the network configuration file for the network interfaces. The type of device can be Ethernet, captivity, bridges, or vlans.
sudo nano /etc/netplan/*.yaml
Then change the value of dhcp4 to noand configure the static IP address details including DNS and gateway addresses as shown below.
network:
  version: 2
  renderer: networkd
  ethernets:
    enp0s3:
      dhcp4: no
      addresses:
        - 192.168.1.0/24
      gateway4: 192.168.1.1
      nameservers:
          addresses: [8.8.8.8, 8.8.4.4]
When you have finished editing the file, save it and exit.
You will need to ensure that the file meets the YAML indentation standards. If it is probably not bleeding, you will get an error.
Run the following commands to apply your changes.
sudo netplan apply
To validate that your changes are applied, run the following commands to view the IP address configuration details.
ip addr show dev enp0s3
It should show lines similar to the following:
2: enp0s3: <BROADCAST,MULTICAST,UP,LOWER_UP> mtu 1500 qdisc fq_codel state UP group default qlen 1000
    link/ether 08:00:27:e0:e9:4d brd ff:ff:ff:ff:ff:ff
    inet 192.168.1.1/24 brd 192.168.1.255 scope global dynamic noprefixroute enp0s3
       valid_lft 976sec preferred_lft 976sec
    inet6 fe80::2aa0:522f:4f82:8d5b/64 scope link noprefixroute
       valid_lft forever preferred_lft forever
How to configure static IP addresses on Ubuntu desktop
To configure static IP addresses on Ubuntu desktops, click on the network icon in the top menu, select Wired -> Wired Settings.

This will open the GNOME network configuration settings. Click on the cogwheel icon.
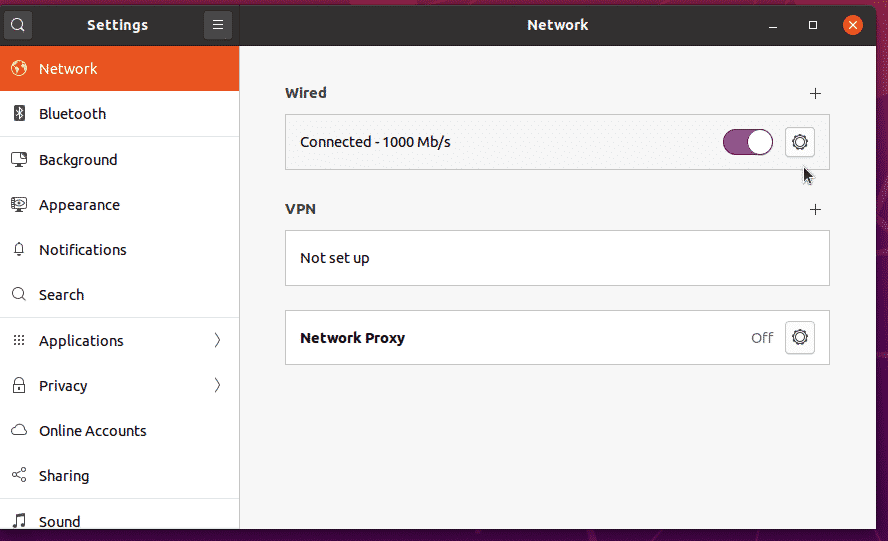
Then choose Manual for IPv4 Method and configure the IP, Network, Gateway and / or DNS addresses. Click on the Request to save your changes.

Here’s how to configure static IP addresses on Ubuntu systems.
For more information on Netplan, visit this site.
Conclusion:
In this tutorial we have seen how to configure static IP addresses in Ubuntu Linux. If you find any errors above or have something to add, please use the comment form below.


