whether you want create or modify a partition in Windows 11 It is very easy to get it! Thanks to the fact that the same operating system has the necessary tool to achieve it. Best of all, this tool is very intuitive and easy to use.
Before starting, we always recommend having a backup of our data. Ideally, we manage to enable automatic backup in Windows; this way we won’t even have to worry about keeping our private files safe.
How to shrink a partition

As soon as we buy a PC, the operating system is installed on a single partition. Let’s pretend we have a 2TB hard drive; we will find a single partition that by default is “C”. Taking this into account, before creating a new partition, we must reduce the space it occupies.
Press the “Windows” key and type “Create and format disk partitions”, press “Enter”.

A new window called “Disk Management” opens.
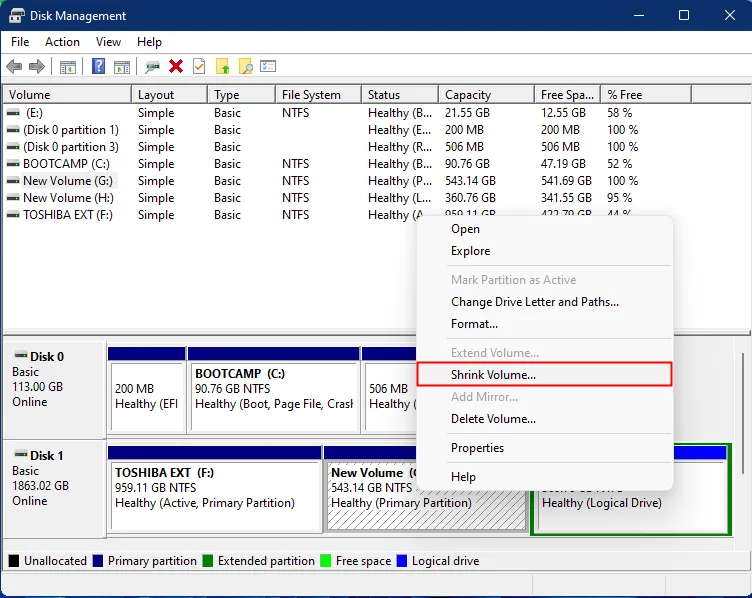
Here we will have to right click on the partition that we want to reduce to free up space and thus create the new partition. So in the drop-down menu we are going to choose “Reduce volume”.

We will see that a new window appears. Here next to “Enter the amount of space to reduce in MB”, we will have to write the size in MB that we want the selected unit to have, once we finish this, we click on “Shrink”.

Now we will see that the size of the volume has been reduced automatically and we will see that there is unallocated space. In the next section of this guide we will see how to assign it to a new partition.
Create a new partition in Windows 11
The first thing we will have to do is click on “Start” or press the “Windows” key on our keyboard. Next, we are going to write “Create and format hard disk partitions” and we give Enter to the first result.

After this, the “Disk Management” window will open. We will have to right click on Unallocated space and select “New simple volume”.

A new window opens that will allow us to create a new volume, we will have to click on “Next”.

In the next window, we will have the possibility to reduce the size of the partition by modifying its default value next to “Simple volume size in MB”. By default, Windows 11 will allocate all the space that is available. When we assign the one we want, we will press “Next”.
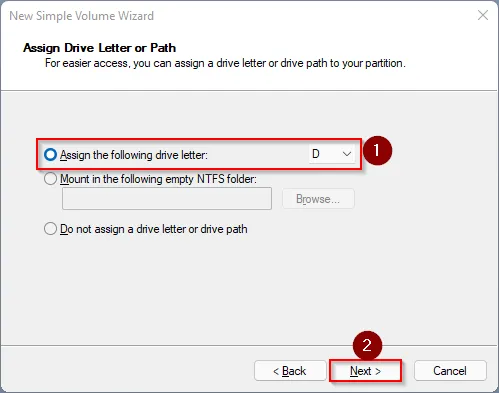
Windows will automatically assign a free drive letter for the partition. If we want to change it, we will have to click on the “Assign the following drive letter” drop-down menu and we will choose the letter we want it to have. When we finish assigning the new letter, we will click on “Next”.

In the next window, we will leave everything by default and click “Next”.

To finish, we will have to click on “Finish” to be able to create the new partition.
The system will take care of creating the new partition and proceed to format the drive so that it is ready to use. We can access it through File Explorer or from This PC.
How to delete a partition in Windows 11
We start in the same way as before, press the “Windows” key and type “Create and format hard disk partitions”.
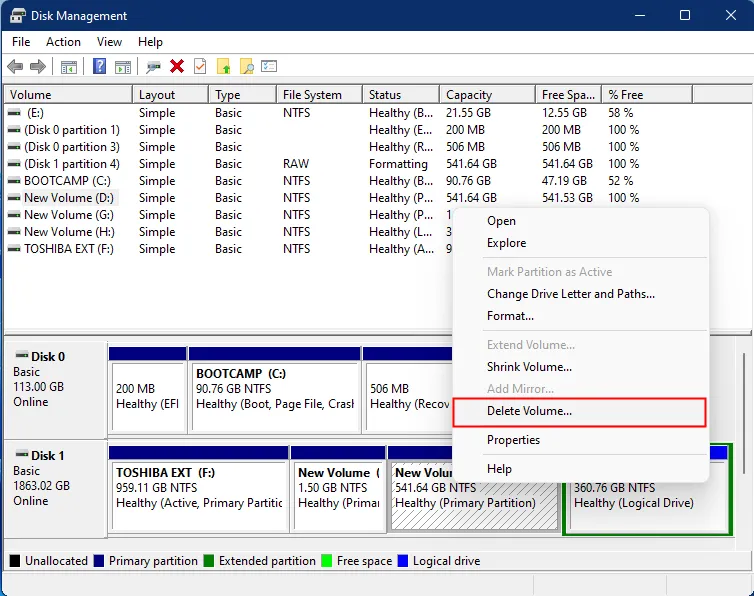
Now let’s go to the “Disk Management” window. We will have to right click on the volume or partition that we want to delete and choose the “Delete volume” option. We must bear in mind that doing this will delete all the files found on this unit, it would be best to make a backup of these.
A pop-up window will appear after clicking on “Delete volume” where we will have to click on “Yes” to confirm and start the process.

