
Take photos ProRAW It is only the beginning, we are also going to have to edit the same in our iphone, to make it something worth sharing. In this guide we will see in detail how we can achieve it easily, quickly and obtaining great results.
Advertising

The ProRAW camera feature is quite a powerful tool provided by our device. A photo we take with ProRAW mode gives us tremendous flexibility of processing an additional RAW file with the advantages of multi-frame computational photography. We have the best of both worlds, although if we follow the guide that we will see below, we will finish the job magnificently, obtaining an unforgettable photograph.
The format in which ProRAW files are saved is Adobe’s DNG, which is compatible with all of today’s RAW photo-editing applications. This translates into something quite simple: we have an enormous amount of options. We can even send the photo to our computer and use desktop software to edit it.
Although in this case, we are going to use our phone to process the image. We will see a guide to do it with the Apple editing tool and a third-party application.
Edit and share ProRAW photos on iPhone with Apple Photos
The interesting thing about the Apple Photos application is that it allows us to edit these photos and it is a powerful photo editor. We do not need to download any additional application. We are aware that a third-party application gives us more options. But if we want to do something simple and fast like increase exposure, blur backgrounds or create image cutouts, Apple’s app more than does the job.

- We open the RAW photo and press Edit at the top right of the screen.
- In case you are viewing the photo in the gallery of the camera application, then the editing options can be seen at the bottom.
- We go through the adjustment options below the image and we will use the tools that we want.
- We can click on the three-ring filter icon at the bottom of the screen if we want to apply a filter. What we must clarify is that it is not about Apple’s photographic styles that are integrated into the camera when we take the picture.
- We also have the option to rotate the photograph, for this we are going to use the crop tool, which is the icon that appears in the lower right part of the editing panel.
- When we are ready, we will have to click on Done in the lower right part of the screen. There is no option to save it as a duplicate or separate image. Although we can revert the changes by opening the original image from the Photos app and pressing the three-dot menu icon at the top right and choosing Revert to original.
After editing the ProRAW photos on iPhone, we’re going to need to use the sharing options from within the Photos app to export a JPEG version of the image. Then, we can send it by email, WhatsApp, post it on a social network or whatever we want.
How to Export ProRAW File from iPhone
But what if we want to export the original RAW image? It can be a bit difficult. After making edits in the Photos app, we won’t be able to easily share the original DNG file. The only way is if we are airdropping the image to a Mac. If this is the case, there is a way to send the original file as the edited JPEG.
Advertising

- We scroll to the photo from the Photos app and press the share / export icon in the lower right corner.
- We will press Options at the top of the screen.
- Here we are going to activate “All photo data” and click on “Done”.
- We press “Airdrop” which is located just below the image and we will select the destination.
- On Mac, we will click on “Accept” and “Save to downloads” when it appears on the screen. A Downloads folder will be created where we can find the DNG file and the edited JPEG.
In case we are not AirDropping on a Mac and we want to send the DNG file to another place, we will have to make a copy of the Edited RAW and revert the changes we have made.
- From the Photos application, we will search for the image in question and click on the three-point menu in the upper right corner.
- We press Duplicate, then click again on the three-dot menu and choose Revert to original.
- Now we are going to press the export icon that is in the lower left corner and we will choose how we would like to send the file.
In case the format we prefer is PNG or HEIF, then we will have to perform some additional steps. You can convert raw DNG or make edits in Apple Photos, then convert the resulting JPEG to PNG or HIEF; although this would not be the best if we want to minimize compression, although it works.
- We scroll to the image in Apple Photos and click on the share / export icon.
- We go down and press “Save to files”.
- We will choose the folder where we want to save and press the “Save” button.
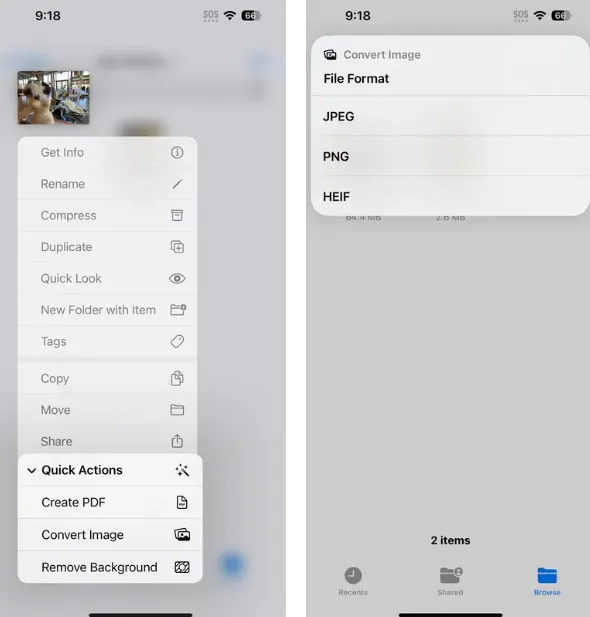
- We open the Files app and choose the image.
- We will have to hold down the thumbnail of the image and click on Quick Actions.
- Here we will choose Convert Image.
- We can choose the format and also the size of the image.
- The converted image will be in the same folder as the previous one.
Edit a ProRAW photo with a third-party app
If we have an image editing app that we want to use instead of the Apple app, we can do that. But we will have to start by opening the Apple Photos app or the photo editing app that we want to use.
If we start by opening the Apple Photos app, we will do the following:
- We look for the image that we are going to edit and click on the export/share icon that is located in the lower left part of the screen.
- Next, we scroll through the application icons just below the photo. Here we would have to find the application we are looking for, when we do, we will press on it.
- In case we do not see the icon of the app that we want to use, we will click on the three-point icon to see additional options.
We must clarify that the only way that exporting a RAW file will work is if we have not done any kind of editing of the photo. If edited, it will be exported as JPEG.
Regarding third-party editors, we recommend Snapseed that we will find available from the Apple Store following this link. Regardless of which editor we want to use, however, it’s a pretty straightforward process.

