
Fill an area in Photoshop It is an extremely useful option that allows us to cover an area of an image with the colors we want. But not only can they be solid colors, we can play with the different options that the program offers us to achieve the result that we are imagining.
Fill an area in Photoshop using the paint bucket
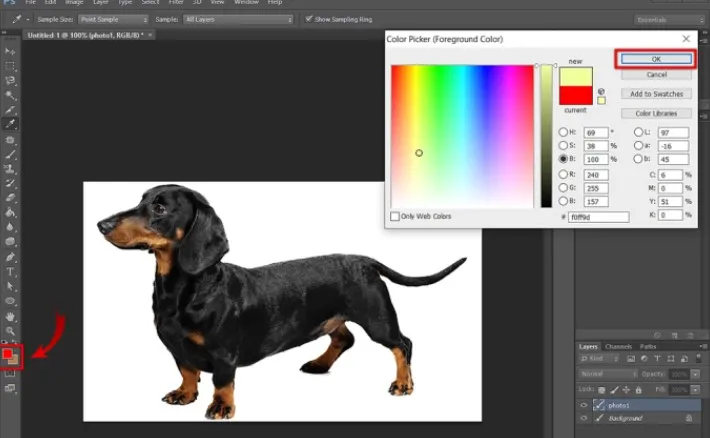
We’ll need to enable the Color Picker by navigating to the Foreground Color Swatch in the Toolbox. Next, we’re going to need to find the color we want to use and select it; we can also select a shade from the color library. When we are sure of the color we will click on Accept.

Now we are going to select the Paint Bucket tool, we can press the keyboard shortcut G. In case it doesn’t work, it is possible that we were using one of the tools that are in the same toolbox. If this is the case, then we will have to press Shift + G or right click on the tool and choose the paint bucket.
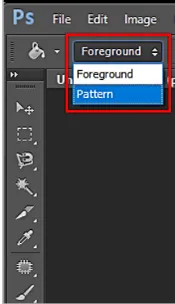
Next, we will need to set the options for Paint Bucket and we have two:
- Pattern: allows us to use a specific pattern.
- Foreground: We can use a color from the color picker and then we can choose the desired pattern from the pattern gallery.

In the Mode menu, we’re going to have to choose a blending mode and find the right opacity for the fill.
- In this case the Opacity field determines how opaque the fill is.
- Tolerance defines how closely the area we fill should resemble the color of the area.
- Contiguous, Smooth, and All Layers will help us define the edges of the fill area.

To finish, we will click on the image with the paint bucket selected.
Fill with the fill command
We will first use the color picker tool to choose the background color. To achieve this we will click on the color swatch in the toolbox on the left. We will choose one of the colors or add the specific formula. Then we click accept.

Now we are going to open the Fill window. For this we are going to press Shift + Backspace on Windows or Shift + Delete on Mac. We will have to choose between background color and foreground color in the Use menu.
The Use dropdown menu has a variety of options: history, white, black, 50% gray, or pattern. Afterwards, the Motif option opens a gallery of several pre-established Motifs, although we can add some custom ones if we wish.

Now we will have to adjust the blending options depending on the original image and click OK.
The Mode menu gives us the possibility to keep control of the combination of the fill with the colors that already exist in the image. The opacity determines how opaque the fill will be. As for the Preserve Transparency checkbox, it will help us make sure that the fill does not affect areas that are transparent.

