
something quite important in photoshop is to learn to do a line, whether it’s stamped either textured. We never know when we are going to need to make a line for our design and with Photoshop, being able to create so many amazing things, it would not be a bad idea to be clear about how to do this.
Previously, we had seen a detailed guide on how to use the Straighten tool or layer groups, for example. Today it’s time to see a tutorial on how to use the Line tool, which will be useful on many occasions, more than we could imagine.
Make a Patterned or Textured Line in Photoshop
The first thing we will have to do is open a Photoshop document, it is possible to create a new one (recommended for testing) or press Ctrl + N to open one.
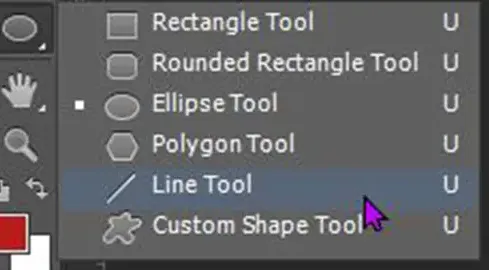
Once we have the canvas ready, it is time to go to the toolbar on the left side and select the Line tool. This is in the group where there is Rectangle, Rounded Rectangle, etc.
Once we have the Line Tool selected in Photoshop, we go to the canvas and hold down the left mouse click, then drag to create the line. In case we want to make sure that the line is straight, we will have to hold down the Shift key while dragging.
We can also press on the rectangular tool and click on the canvas. We will see a Create Rectangle window. We’ll specify the dimensions we want for the rectangle, and then click OK to confirm.
Make the line more visible

By default, the line will be thin and it will take the current color that we have selected. The image that accompanies this text is the line when we draw it, the H value (height) is 1 px.

With the line still selected and the line tool active, we’re going to see a menu in the top menu bar. Here we will be able to change several things such as: fill, color, thickness, etc.
We can go to the H (height) box and change the value to a number that will make the line thicker. We can also type the new value and press Enter, which will cause the line to resize. The line that we see in this article has a height value of 10px.
Another thing we can do is change the length of the line by choosing a value for W (width). We will write the value we want, press Enter and the length will change.
How to add a pattern using the layer style option
Once we get the line bigger, we can add a pattern thanks to the layer style feature.

For this we are going to have to go to the layers panel and right click on the layer where the line is located. We will see that a menu appears where we will have an option called Fusion Options which we will click on. A pop-up window will appear and we will look for the option that says Pattern Overlay in the left sidebar.

Here we are going to see several Pattern Overlay options, we will have to choose the one we want. We also have the possibility to add more styles to the line by clicking on the other style names. In this example, we will use the focus pattern.
If we want to make the pattern more visible, we’ll make a line that’s wider. In this case the line is 30px, so it will be quite visible.

In case we don’t like the patterns that we have available too much and we want to add more, it is possible to do so. We will have to click on the dropdown list next to the pattern swatch to show patterns. We will see a small gear-shaped icon in the upper right. We click on this to see a new menu in which we will scroll down and choose a new pattern category.
When we choose the pattern we like, we’ll be asked if we want the current patterns with the new categories. We can click OK to replace or add them as extras while keeping the old ones.
Remember that it is also possible to add custom patterns that we can download from the internet.
In the same pattern menu we can change the opacity and size of the pattern. If we want to change the opacity, we are going to have to drag the Opacity slider to the left or right. To change the size of the Pattern, we’re going to use the Scale slider.
Add a pattern using the stroke
With the line tool selected, we’ll go to the menu bar at the top and look for the line options bar. We will add a fill color to the line if none is selected. Now, we’ll apply a stroke control.
With the stroke added, we will change the type to the one we want. The stroke will form a pattern on the line. The wider the line, the more noticeable the pattern will be, and the design will change slightly as the line gets wider.
Using shapes to create a patterned line in photoshop
The way to create patterned lines is with shapes. Specifically with Rectangle. Actually, it is a method too simple to carry out.
For this we begin by going to the tools panel that is on the left side of Photoshop and we are going to choose Rectangle. It is in the same group as the line tool.
We can draw a rectangle by clicking on the screen. We will see a box of options to create a rectangle. We will only have to enter the measurements and click OK to create it. The rectangle will adjust to make the line thinner or thicker.
Obviously, we can change the size by clicking on it and pressing Ctrl + Y to open the transform window around the rectangle.
Now, in order to add a pattern, we are going to select the newly created rectangle layer. In the Layers panel we will right click on the one we want and choose Layer Styles (we can also double click on an empty space of the layer in question).
We go to the menu on the left and choose Overlay to be able to add the pattern to the rectangle. The way to choose the pattern in this case does not vary at all with what we saw a little above.
And now we will have the line made of a rectangle and with the pattern that we want. As we can see, it is not something complicated at all.

