
Obviously, not all emails that we receive are really important, so we must achieve that those emails that really are, stand out in thunderbird. The vast majority of users understand that some emails are more important than others, whether they are family, friends or work.
Luckily, the vast majority of email services have very interesting functions that will help us highlight these emails that we believe are important and should stand out from the rest.
In this guide, we will see how to fix or anchor messages that we want to stand out, those that we consider important in Thunderbird to always be aware of what we receive.
Message filters in Thunderbird to make important emails stand out
One of the most interesting features of Thunderbird email is the ability to filter messages. All Thunderbird users will have the following options available to them:
- Starred Posts – This will add a yellow star icon to email lists.
- Set high priorities for emails: we can highlight those emails with the selected priority. We can choose between high or higher. One thing to consider is that the priority column is not visible by default.
- Add labels: we can also add labels that are displayed with different colors in the lists and we can see them in the email header.
- Move messages to a specific folder: received messages will be automatically moved to a folder that we previously selected.
All of these options are available as actions in Thunderbird. It is true that we can use all these options to be able to highlight emails that we consider important. In our opinion, the best feature to achieve this clearly and precisely is the labels.
The reason? Star icons are helpful, but email titles can also have star symbols, which can make it a little tricky to figure out which ones we care about.
Priorities may work, but they won’t show up by default and add a new column to the email list. We can also use the option to move messages to a specific folder, although we will have to constantly go to it.
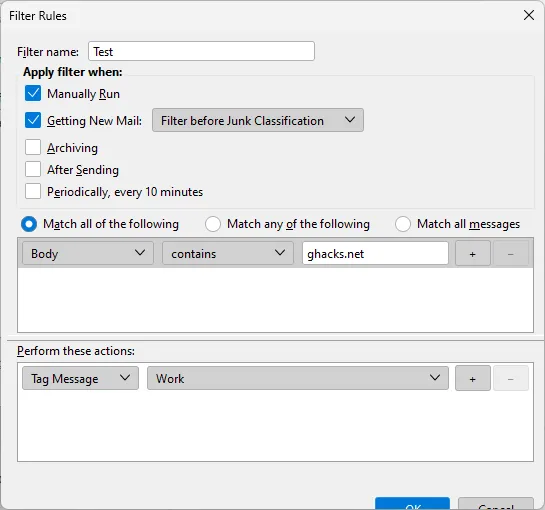
How to add new filters

- We will choose Tools > Message Filters from the menu.
- We’re going to have to make sure that the correct email inbox is selected at the top.
- Here we are going to select New in the interface.
The filter rules are going to be divided into a few sections:
- Filter Name – This is used to identify the filter.
- When the filter runs, it defaults to manual and upon receipt of new emails. The options that are not active by default are: archive, after sending and periodically, every 10 minutes.
We will also have to choose the matching rules:
- Matches the following: We will need to specify what to match.
- Match Any of the Following – Has to match, even if it is a specific rule.
- Match all messages: Appears on all messages in that inbox.
Each rule makes use of an identifier: subject, email address, name, condition (begins with), and a string. We will have to configure all three.
We will perform these actions: this will define what Thunderbird will do with the emails that match the rule(s). We will select Label messages and we will choose one of the available labels, for example, we will choose the one that says Important.
Once we’re back, we’ll be able to run the new manual filter on the mailbox to highlight all similar emails immediately.
If you decide to use tags, it might be best to use tags for different use cases. We can configure the labels from Configuration> General> Labels. Here we will find several options, among which are available to create new or delete existing ones. The labels will have a specific color associated with them.

