
When we have several conversations, everything can get out of control in a matter of seconds. So it’s an excellent idea. organize our Slack channelsIn this way, we will be able to have a better follow-up of all the conversations.
We cannot deny that Slack is a considerably useful application in the workplace, which allows us to carry out a survey in a matter of seconds, saving us a lot of time. However, if you’re new to Slack, you may find it useful to learn how to set up an account step by step, which is essential to do correctly for a better experience.
Organize Slack channels
Highlighting preferred channels

For free accounts we have two tools available. The first of these is to highlight a channel that we want to pay more attention to. Those channels that we highlight will appear in the top channel list, in a category called Featured, obviously.
If we are on a computer, we will have to right click on any of the channels and select Move to > Featured. From the mobile app it’s similar, we long press the channel and choose Move to > Featured. After doing this, we will see a new category at the top called Featured, with all the assigned conversations.
Mute unnecessary channels
It would be quite normal to have several channels that we use from time to time. If we have channels that we will see every so often and they are not that important, the ideal would be to silence them.
From the desktop application we will right click on the name of the channel and choose Mute. From the mobile app it is the same, we leave the channel pressed and press Mute.
create sections

This feature is now available for paid accounts. We can create different categories, which are called sections. In this way we can organize the different channels, any channel that we do not categorize, will stay in Channels.
We can create a section called priority for those channels that we will always pay attention to. Another Interesting call for channels that we want to monitor, but aren’t really important. And finally, we create an extra one for those channels that we go to see from time to time.
To create a new channel, we can only do it from the desktop version.
- We right click on the channel that we want to recategorize and click on Move channel.
- We will select Move to a new section.
- In the pop-up window, we will have to select Create a section in the sidebar, we will write the name of this new section and click on Create.
- The new section will appear at the top of the channel list, we can move it by holding down the click and dragging.
Move channels between sections
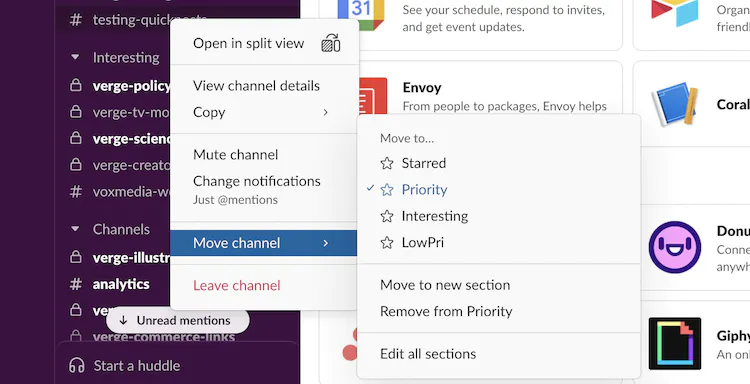
After we have all the sections created, we can move any of the channels to a new section.
- From the desktop, we will click and hold on the name of the channel and drag it to the desired section. We can also right click and select Move channel and then choose the section.
- In the mobile app, we’ll long-press on the channel name and in the pop-up menu we’re going to choose Move to and choose the section where we’re going to take it.
If we say remove a channel from the current section, it will go back to the main section called Channels, it will not be removed.

