
It is very likely that we heard about CPU and GPU overclocking at some point. But did you know that it is also possible to do overclock still Monitor? In this article we are going to go into detail about everything we should know before trying it and how to proceed if we are convinced.
What is monitor overclocking?
Overclocking a monitor means that it exceeds the refresh rate of the monitor itself. The refresh rate is the number of times the monitor refreshes in a single second. All monitors run at a minimum of 60Hz which is a standard refresh rate. However, there are screens with refresh rates of 144 Hz, 240 Hz, 360 Hz and 500 Hz. The latter are intended for competitive gamers.
In order to overclock the monitor we bought, we will have to use third-party software to force a signal with a higher refresh rate. We can do this with the program that the manufacturer of our GPU provides, such as NVIDIA, AMD or Intel, or with an application called CRU (Custom Resolution Utility), we are going to explain how we use the latter.
What we must keep in mind is that in the same way as any other overclocking, it pushes our monitor a little further from the advertised limits. At some point the monitor will not accept any signal that we are sending it, this would be on the ceiling where we will have to stop and confirm how far we have arrived.
Can you overclock any monitor?
What we need to consider is that not all monitors support overclocking. It is very possible that we can only overclock monitors that are designed for gamers, some even advertise in their marketing campaign that they are suitable for overclocking. In the case of standard 60 Hz office monitors they may have severe difficulties to exceed this frequency.
But the situation can be a little more complicated, because there can be a degree of variation between different units. We can have two monitors of the same model, same manufacturer, and get higher refresh rates on one than the other. The difference is marked in manufacturing tolerances. The only way to know if our monitor can be overclocked is basically testing it ourselves.
Once we get all of this pretty clear, many monitors can be modestly overclocked. This means that we can push the monitor down to around 75Hz easily, this will make a small improvement in terms of overall smoothness.
When we overclock, the resolution we choose can affect the chances of success. Lower resolutions will be able to enjoy higher refresh rates. So if we want more FPS, we would have to consider lowering the resolution.
Another thing to worry about is the possibility that bandwidth can create a bottleneck. A 4K (UHD) 8-bit signal at 60 Hz uses 17.82 Gbps. If we connect a computer using an HDMI 2.0b cable, our total bandwidth is 18 Gbps. Let’s just say we won’t have extra bandwidth to accommodate a higher refresh rate, even if the monitor allows it.
We can avoid this by using DisplayPort (DP). The DP 1.4 standard has a maximum throughput of 32.4 Gbps, while DP 1.2 goes up to 21.6 Gbps.
How to overclock a monitor
In order to access refresh rates that are not available in Windows settings, we are going to have to use third-party software. The easiest way to achieve this is by using the program provided by the manufacturer of our GPU.
When we do, we recommend doing increments of around 5 Hz. Another thing we recommend is to reboot the computer once we’ve established an overclock and run these utilities again to make sure the settings are in use.
From the NVIDIA Control Panel
If we have an NVIDIA GPU we will have to download NVIDIA Control Panel from the Windows store by following this link. Once we have the app open, we will expand the Screen menu and choose Change resolution; now we will click on Create custom resolution.
A window will appear where we will have to enter the horizontal and vertical pixels we want, then we will decide what refresh rate in hertz we are going to use. After this, we have the possibility to Test the new configuration through the corresponding button. In case the monitor doesn’t turn black and display an image, we can save the custom settings and keep testing until the allowed limit is reached.
In case the screen stays black, we will not click or press any key on our keyboard. We are simply going to wait for the configuration to be reverted.
Using AMD Radeon Adrenalin Settings
In the case of AMD graphics cards, we are going to have to download AMD Radeon Adrenalin from the official Web. Once we have it installed, we will right click on the desktop and we will choose AMD Radeon Settings.
A window opens with an infinite number of options, but the one that interests us is the one that says Screen. We’ll click the Create button next to Custom Resolutions and enter the resolution we want along with the refresh rate. We press save to test and activate the new configuration.
With Intel HD graphics
If we have Intel HD Graphics we can also create custom resolutions. The Intel HD Control Panel is installed along with the drivers, so we proceed to open it and then click on Show followed by Custom Resolutions. Here we will be able to add a resolution and refresh rate, click on Add to test it.
Using CRU to overclock a monitor
We also have another option that is a third-party application called CRU (Custom Resolution Utility) thanks to this application we can configure a custom resolution and refresh rate for the monitor. Thanks to CRU, we will be able to add custom resolutions to the Windows display settings.

To get started, we’re going to have to download the CRU zip file from this link and we will extract the content. Once it is unzipped, we will right click on the CRU.exe button and choose Run as administrator.

We are going to have to use the dropdown menu at the top of the screen to choose which screen we want to overclock. From here, we’re going to have to click Add next to the four Standard Resolutions. We will see that a window appears, we are going to enter the resolution that we want along with the update frequency. After this, we click OK to save and then proceed to restart the computer.

Once Windows starts up we are going to have to right click on the desktop and choose Display Settings followed by Advanced Display and then under the monitor of choice we are going to have to choose Display Adapter Properties followed by the Monitor tab , in which we can configure the new update frequency. To test, we will press Apply.
Check the overclock to the monitor
So, we have already managed to overclock the monitor. What we will need to do next is verify that it shows all the frames that it is sending. Some monitors can accept a signal with a higher refresh rate than officially supported, but the monitor may have some problems displaying all the frames. This can cause frame skips.
When this happens we may see jerky movement and noticeable stuttering. Overclocking is intended to produce better image results, more smoothness, etc. Skipping frames can make all our work pointless.
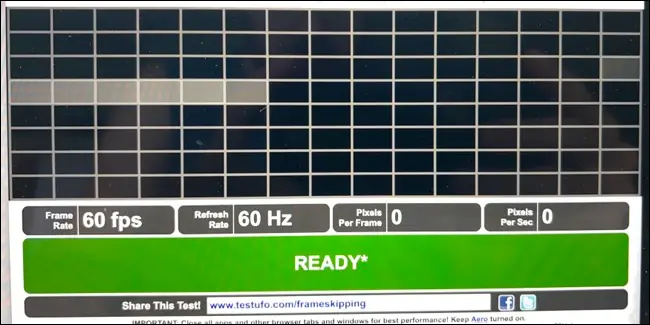
Luckily, we can test that the overclock to the monitor works as expected thanks to the “Frame Skipping Check” web application from Blur Busters. The test is based on taking a picture of the screen using a slow shutter speed, which you can do with most smartphone cameras these days. We are going to need access to the manual controls of the camera, since we will have to set the shutter speed to one tenth (1/10) of a second.
So we’re going to launch Frame Skipping Check from our web browser and wait until we see the “Done” notification in green. Once we see it green, we can set the camera’s shutter speed to 1/10th of a second and take a picture.
Next, we will see the photo we have taken. If we see an unbroken line of light squares like in the image above, then it’s not skipping frames. But if we see black frames between light frames (Like this picture) then the monitor is skipping frames.
How do we fix it? The only way to do this is to reduce the refresh rate and test again until you find an optimal result.

