
Every so often, record an audio in windows 11 can be too useful. Whether we want to send a detailed and specific description about something we are working on or maybe while we are working on video editing add background audio. Be that as it may, Windows 11 allows us to do it in two very simple ways.
Record Windows Audio with Windows 11 Sound Recorder
The new Windows 11 operating system has a built-in sound recorder that works very well and is easy to use. Microsoft updated its Voice Recorder app, which is based on UWP. Now I change the name to Sound Recorder and it has a new design, which goes hand in hand aesthetically speaking with all of Windows 11.
The best thing about Sound Recorder in Windows 11 is that it allows you to record in different formats: MP3, M4A, WAV, FLAC, WMA and several more. Additionally, it is possible to choose the audio quality: automatic, medium and better. We can change the input device (microphone) in the same app. Although if it is to record music, we recommend using specific music software.

The first thing we will have to do is press the Windows key and write voice or sound. The Voice Recorder or Sound Recorder will appear.
We open the application and it will be updated to the latest version of Voice Recorder. We also have the option to update it directly from the Microsoft Store from this link.

Next, we launch the Sound Recorder app. At the bottom left, we will find the recording device drop-down menu. We will have to click on the red Record button at the bottom in order to start recording audio. In case we want to stop the recording, we will simply click on the same button again.

After this we can right click on the audio that we have recorded and open the file location to be able to find it quickly.

Another option that we have is to mark the audio intervals with time stamps and it is also possible to change the playback speed from the menu with three points that we will find in the lower right.
To change the recording quality of Windows 11 we will have to go to Settings by clicking on the icon of the three ellipses in the lower right, a menu is displayed and we will find the option.
With Audacity
The first thing we will have to do is download Audacity from this link. Although we also have the option to download it from the same Microsoft Store from here.

When we have it installed, we will open the application from the Windows start menu. Once open, next to the microphone icon at the top, we can choose the input source to record the audio.
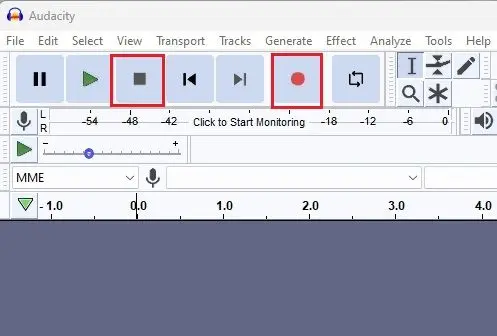
Now, we click on the icon of a round circle to start the recording. If we want to stop it, we can press the gray Stop button.

Once we finish the recording, we will press the green playback button to listen to it. Audacity allows us to edit the recording, it is a program that has complex and varied options, one of the best for audio editing; especially considering that it is free.

In order to save the recording, we will have to click on File and choose Export. Here we can choose the format we want.
We proceed to choose the folder where we want to save the recording and press Save.

