
- Around the world, every day, thousands wonder how to recover deleted photos from the trash
- There are several programs that promise to do it, but only a handful of them deliver.
- Why Tenorshare 4DDiG is one of the best and how to recover photos step by step?
The Windows Recycle Bin is one of the objects and functions on which this operating system is based. All the elements that we delete go to it, and there they remain unless we later choose to empty it. Many of us are in the habit of doing so, to prevent them from accumulating, but we can make a serious mistake. Among them, deleting things by mistake, such as photographs. That’s why, knowing how to recover deleted photos from the recycle bin will allow you to have back the files that you thought were lost forever.
In principle, this is good news if you just got confused and got rid of items you didn’t want to delete. Although they are apparently deleted, you should know that there are programs that have been designed to be able to recover them, which have greater potential to solve these problems than Microsoft tools.
Therefore, we can say that a photo deleted from the recycle bin can be recovered effectively. But you have to know how to do it and act as soon as possible, because the passage of time conspires against the objective.
How to Recover Deleted Photos from Recycle Bin Easily
We said then that We may have accidentally deleted photos, and the first thing we usually do then is go to Google, and type searches like “recover deleted photos from pc trash”, which immediately throws us a lot of applications that promise to get us out of this bad situation.
The drawback is that not all of them fulfill what they promise, and that is why we are going to focus on one of the ones that we have been able to verify that they really do, Tenorshare 4DDiGnot only to analyze its operation but also to explain how to use it step by stepespecially if you are a beginner in having to recover elements.
4DDiG is an application that has been specifically developed for this purpose, so You will not find meaningless menus or sections that do not contribute anything to the attempt to recover deleted photos from the trash.
Main advantages of Tenorshare 4DDiG
Any file types and devices
This program can handle more than 1,000 file types, including rare ones like NTFS, FAT, or APFS. It also has no device limitations, working on USB Flash drives, hard drives, cameras, etc.
Integrity
Unlike others, the files are fully recovered, and they look exactly the same as before they were deleted. Thanks to an exclusive and patented technology, Tenorshare 4DDiG manages to preserve formats and sizes.
preview
Tenorshare 4DDiG
By installing and downloading it, you have one of the highest data recovery success rates in the industry considering all possible scenarios, so you are never left regretting the mistake you made.
100% sure
Security is another preponderant factor, and this application is completely safe on all types of equipment.
How to recover deleted photos from the recycle bin for free?
You already have an idea about the great benefits of this tool, so it’s time to go back to where we came from. pay attention to learn recover deleted photos from recycle bin in windows 10.
Using cmd
To gauge what 4DDiG does, it is important that you first know what other photo recovery options we have available, being CMD the one that Microsoft offers us and with which you could do the first test:
- Press the Win + R keys and type cmd, pressing Understand to open the command window
- Type chkdsk E: /f where “E” is the drive that this content was on
- Tap Y and then go to Enter to continue with the procedure
- Type E: >attrib -h -h -r -s /s /d *. being “E” the disk drive in which that content was
That way, all the files should be back… or that’s what Microsoft says, because in practice we know what the restrictions of this solution are, and why most prefer to skip it.
Using 4DDiG
- Once 4ddig is downloaded and installed on your PC, run the program like any other

- On the main screen you will see the main storages of your equipment
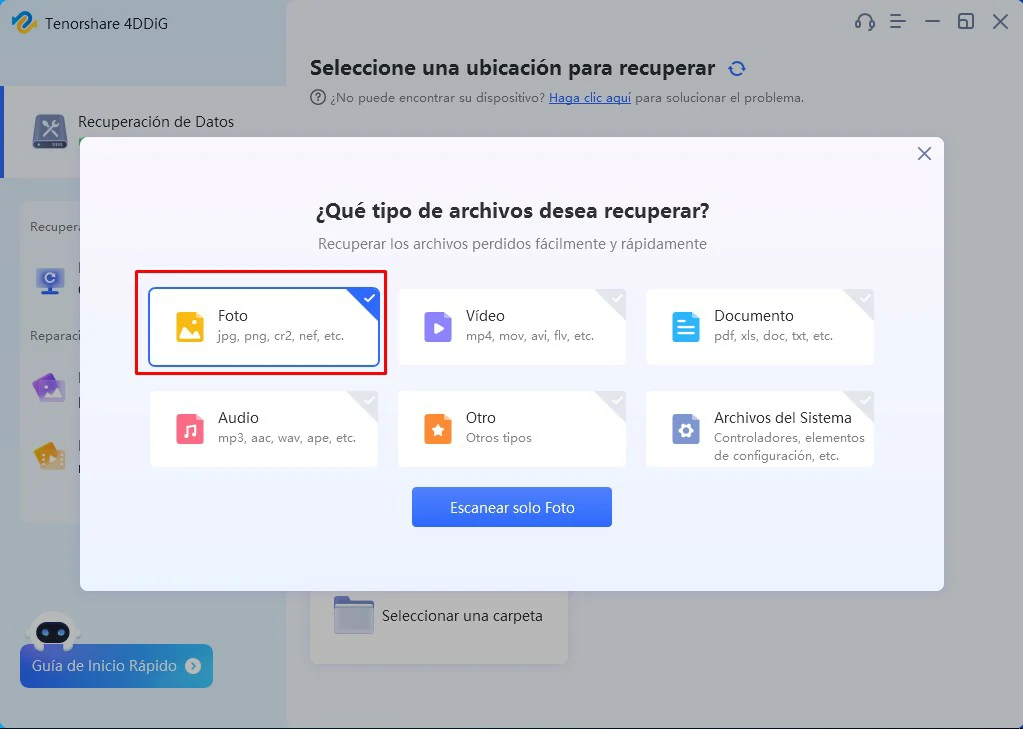
- Select the storage and file type, and click Scan
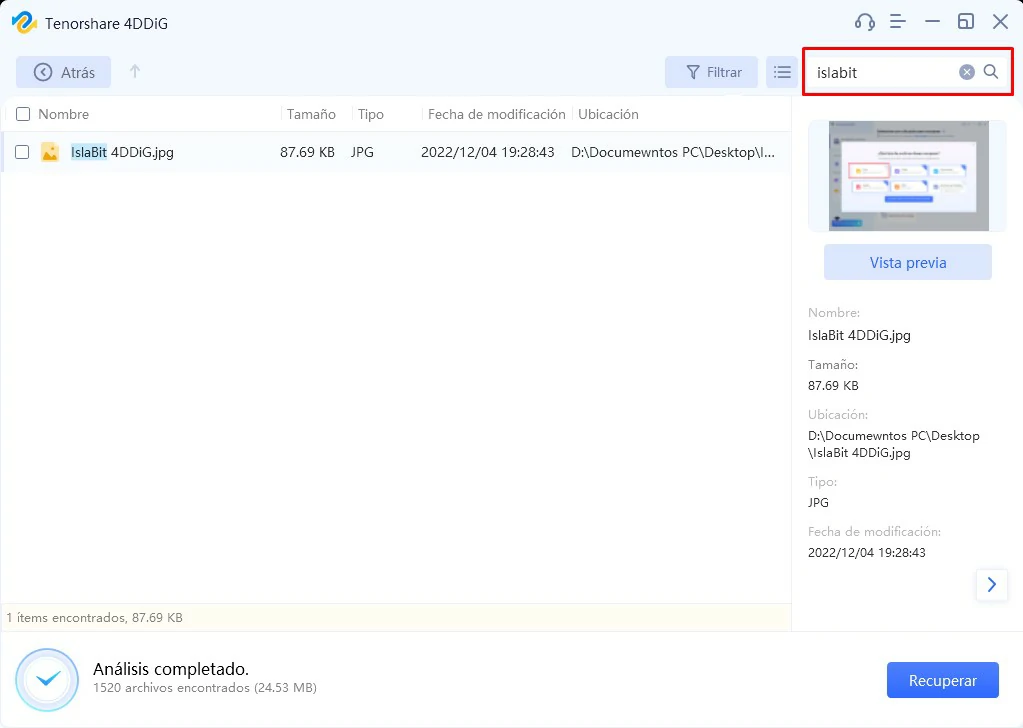
- Wait for the scan to complete and use the Filter feature to search for specific results

- If the deleted document is found among the results, mark it, and press the Recover button

- Confirm that you want to recover it in some route, and after a few seconds you will have it there
conclusion
We can then say that 4DDiG is all you need if you ever mistakenly delete a photo or image. You will have noticed that its use is simple, and it does not suppose complications even for the beginners.
Remember that, just as you can recover photos, you can also recover other files, such as Office documents, program executables, or any other that has been deleted by mistake.
Have you managed to recover photos from recycle bin free with Tenorshare 4DDiG yet?

