
- Knowing how to trace an object or an image in InDesign is important to be able to digitize physical art
- You can trace any element or photo you want with the specific tools for it
With the rise of digital art it is very important to be able to digitize physical art, so knowing how to trace an object or an image in InDesign is key to being able to perform some specific tasks in this Adobe program.
Advertising

Tracing in InDesign may not be the same as tracing on paper, but we can assure you that it is possible. Only you have to discover what are the tools that will allow you to carry out the work.
Basic steps to trace an object or image in InDesign
Open and prepare InDesign
The first step to tracing any object in InDesign is to open and prepare InDesign by opening a new project from Create New, Document. Choose the corresponding Options and wait with a blank page.
Place the image in InDesign
- To upload the image in InDesign, you have to go to the top menu bar and press File, Place
- Immediately the Place window will open for you to search for the file and press Open in it
- The image will automatically appear on top of the InDesign project for you to work on.
Lower the opacity of the image
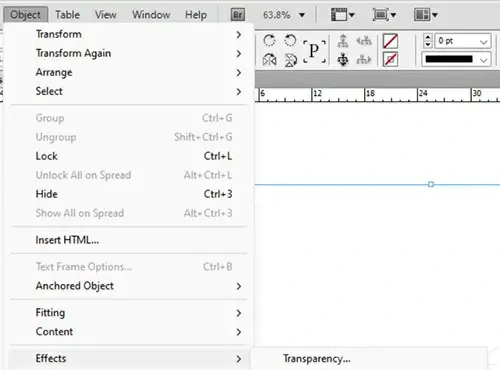
Reducing the opacity of the image is a crucial step to replicate the effect of tracing paper on it. You can reduce the opacity of the image from Object, Effects, Transparency, applying the one you prefer.
Stroke with the Pencil tool
The Pencil tool is indispensable in this type of tutorial, and is one of many in the Tools panel. Selected, click on the starting point of the image and, without letting go of the mouse, draw lines. You should only release it when the outline of the object or image is completely drawn.
By default, the fill color is enabled so you will see how the added color completes the stroke. You also have the Smooth tool to straighten the line so that it is not so straight but softer.
To differentiate the line that is active from the ones that are inactive, you have to pay attention to which one is blue. Eventually, you can use the Pencil tool to edit the active line, splitting or extending it.
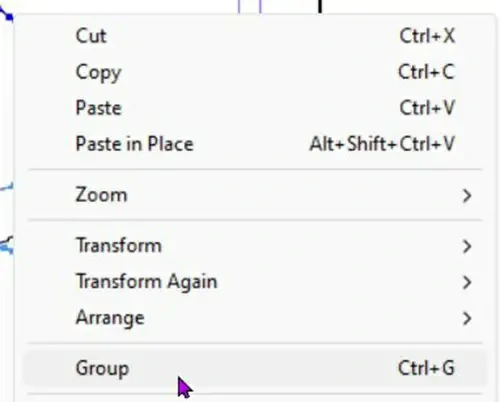
If you want to group the parts into one so they can move together, click on each line while holding down the Shift key. With all the lines selected, right-click on the artwork and, once in that menu, select Group. Otherwise, you can opt for the alternative of combining Ctrl + G.
Stroke with the Pen Tool
For details, you can trace with the Pen Tool, although we warn you that it requires more experience. This tool is in the Tools panel on the left and, unlike the Pencil, you have to make short to medium clicks from the start point to the end rather than a straight, unbroken stroke.
Advertising

As we said previously, the Pen tool is usually used to refine the details of the trace.
Crooked strokes with this tool can be corrected from the handles by hovering the tool over the line segments and paying attention to the symbol next to it, a + symbol indicating that you can add a handle. By adding it you have the possibility to change the appearance of the stroke from that point.
As before, you can also correct crooked pencil strokes with the Smooth as Pencil tool.
Delete the original image
Now that most or all of the image should be traced, it’s time to delete the original image. Assuming the original image and the stroke are on the same layer, you’ll need to open the layer and delete the original image.
You can open the layer from the Layers panel, by clicking on the arrow on the name of each of the layers. You’ll see a list of things that are on the layer, so you can spot the original image and drag it to the Trash. Clear, if the image is on a separate layer, just delete that layer. And ready.
Group the drawn lines
If you didn’t group the lines drawn up to here, you need to do so before finishing the tracing process. You probably have lines drawn separately if you’ve taken advantage of the two available stroke classes.
To group the strokes, click on one and, holding down the Shift key, click on each piece. Selected all, right click and Group, or press Ctrl + G. In seconds, they will be grouped.
Have a question about how to trace an object or image in InDesign?

