- As in the fashion industry, in Photoshop we can play with color samples
- These samples allow us to faithfully recreate the colors of editions and presentations
- How can we create them and what are the main actions that can be carried out with them?
If you want to dedicate yourself to graphic design or you are taking your first steps in image editing, there are some things that you will discover over time, as you become familiar with the best programs in the sector. That said, and in order to save you a few hours of work, we believe that you better know how to create and use color swatches in Photoshop as they will allow you to be more precise in your presentations.
At the end of the day, consistency is very important for any graphic designer, and if you want to be consistent, without ceasing to be exclusive or different from the others, you have to be able to faithfully recreate the colors.
In case you don’t know, when we refer to samples regarding this application, we are talking about an example. Basically, an example of the color we are looking for so that we can show it to the client or have a reference. A bit emulating the fashion industry, Photoshop has its own swatches that we can use.
Create and use color swatches in Photoshop
Custom color swatches can and they are often used to save the color of objects such as plants, fruits, seasons, logos, etc., which would then be very difficult to replicatewhich could lead to some error.
According to the level of light that the colors have and the new tones that are produced, we can create samples. There are endless situations where it may be worth saving samples for future use.
Open the image to sample
First, we are going to work with a ripe sweet bell pepper, opening Photoshop and, in File, opening the image that we have saved. We will quickly see that There are many colors on the screen. Therefore, as we have been explaining, reproducing those colors accurately requires “samples”..

Remove default samples
Before saving our own swatches, we recommend that you delete any previous custom swatches. are you really they do not disappear completely, but are only removed from the Swatches screen.
Unfortunately Photoshop doesn’t have a button to delete all swatches, so you have to delete them one by one. You have to go to the Swatches panel, right click on the ones you want to delete and confirm this action.
Yes even then want to save time by any means, you can go to the Preset Manager, where you will see the samples. You have to select them all and press Delete. If you need them, tap Reset.
Of course, if you already know that you will need a sample, this last trick will not help you much.
sample colors
Dropper is the function that allows you to click on each of the color tones to be able to distinguish them. You have to open it from the Tools menu on the left of the screen, selecting the regions to sample. We can see in this screenshot how you can clearly distinguish the green color of the stem of the pepper. Obviously, the circle that surrounds the color helps to know if it is the tone that we are wanting.

Save colors in swatches panel
Once you’re happy with the correct color swatch, in this case green, go to the Swatches panel. clicking there, A window will appear for you to name the color, so write something descriptive.
Later, when you mouse over the color in the Swatches panel you will see the name chosen for these. With the eyedropper tool you can keep sampling more and more colors and adding them to the panel.
Save swatches as a swatch set
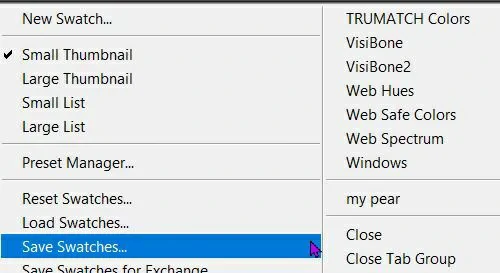
At this point, you have to save the colors as a set of swatches, just like saving them in folders. You have to go to the Swatches panel, click on the menu button at the top right and, in the new dropdown menu, click on Save Swatches. You can assign the name you want so you don’t forget it in the future.

Returns the default samples
Now that you have created some custom samples, we advise you to recover the default ones. As we showed you before, you have to go to the Samples panel, to the menu button, and click on Reset.
Photoshop will ask you if you want to replace the current color swatches with the default ones. You will need to click Add to keep the custom swatches and add the default ones to it.
Use custom swatches
To use custom color swatches in the future, just go to the trouble of uploading them. You can upload them from the Swatches panel, where they will appear alongside the other swatches that are available.


