All the time we receive spam, work, friends, unknown and automated emails. On this last point, if others can do it, so can we? If it’s posible to send e-mails from auto reply on gmail and the process is too simple.
It is possible to create different custom templates to answer different types of emails optimally and automatically. We can create as many templates as we want for each of the situations that arise.
Enable the option to create templates

You can create and use templates from the Gmail official website. But before we get started, we’re going to have to enable them. For this we will have to enable the option, we will click on the configuration icon in the upper right part (it has the shape of a gear) and we will select “See all the configurations”.

Here we will go to the “Advanced” tab that appears in the upper right and we will check the “Enable” option on the right side of “Templates”. In order to save the changes we will click on “Save changes” in the lower center of the screen.
Create an email template in Gmail

Once we have this option enabled, it is time to create a template. We start by clicking on “Compose” in the upper right to create a new email as we normally would. We click on the body of the email and proceed to write the message that we want to be saved as a template.
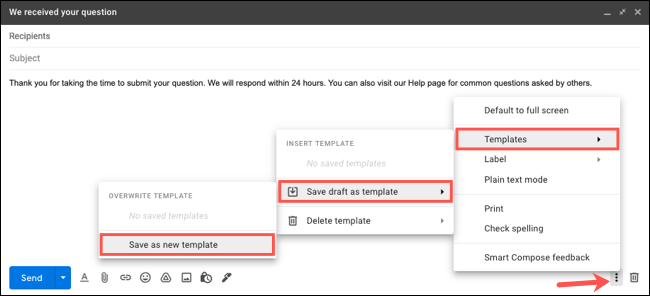
Once we finish, we click on the three points that are in the lower right part of the email to show “More options”. We move the cursor to Templates > Save draft as template > Save as new template.

We assign a name to our template and click on “Save”.
After this we can close the email by clicking on the “X” that is in the upper right.
Set up auto reply for emails in Gmail

Once we have the template created, we can configure the filter that will automatically send it. We will return to the Gmail settings using the gear-shaped gear icon and select “See all settings”. On this occasion, we are going to go to the “Filters and blocked addresses” tab, in this section we will have to click on “Create a new filter” at the bottom.

Next, we are going to enter the criteria for the incoming messages that we want to request in the automated email. For example, if you have a link to a website, we may include it in the Subject line. Or if you ask others to include certain words, we can. Once we finish configuring everything, we click on “Create filter”.

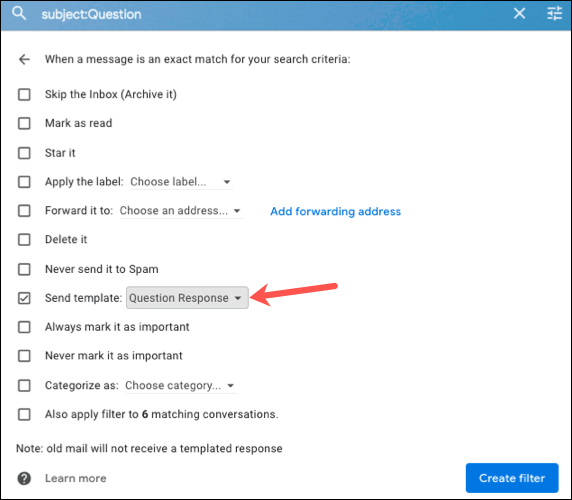
On the next screen we will see the actions for the matching emails. We will have to check the checkbox for Submit template and choose the one we have created from the dropdown list. In case we want to perform additional actions, we can also do it from here. For example, we can apply some label or resend the email to follow up, you have several options.
Once we are done, we again click on “Create filter”.

In order to verify if the configuration works as we wish, we can send ourselves a test message that meets the criteria that we specified above.


