
Google provides labels in Gmail to help you organize your emails. You can apply labels in a similar way to placing messages in folders so you can quickly find what you need. And in addition to selecting a label from the menu to see all the emails that are applied, you can see those labels in the messages in your inbox.
Labels in Gmail go beyond simple labeling. You can nest tags within others, color the tags to detect messages at a glance, and show or hide certain tags based on how often you use them. Here’s how to use these additional features to get the most out of your labels in Gmail.
Nest a label in Gmail
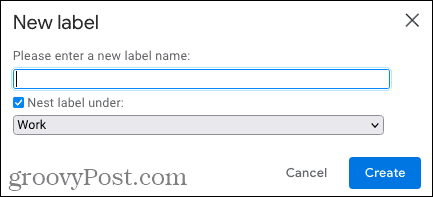
You can nest one tag inside another when you create it, or do it later by editing the tag. Label nesting in Gmail is a wonderful way to keep your messages organized.
Working with nested tags is similar to working with folders and subfolders. For example, you can create a tag for Job. You then nest new tags within Work for things like Customers, Projects, and Meeting Notes.
You can also nest tags within sub-tags. For example, you can have the main tag Work, the sub-tag Project, and the sub-tags within Projects A and B.
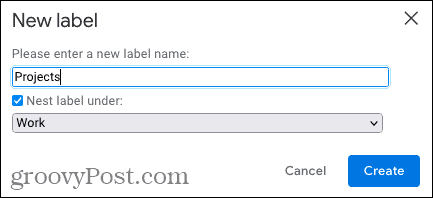
- To nest a tag when creating it, simply check the box and select the parent tag from the drop-down list.
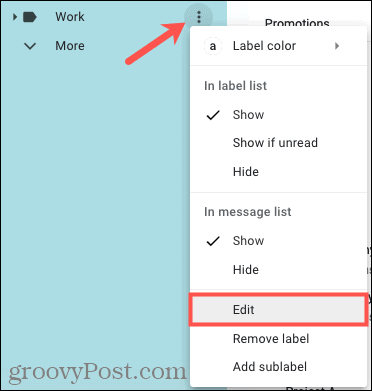
- To nest a tag after creating it, click the three dots next to the tag in the side menu and select Edit. Then check the box and choose the main tag.
You’ll see your tag nested below its parent in the side menu. And the parent tag becomes foldable.

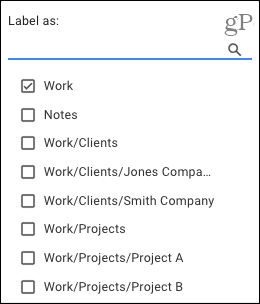
Also, when you apply a label to an email, you will see the label nested next to the parent as “label / sub-label”.
How to Create a Sub-Label in Gmail
You can also easily create sub-tags (nested tags) to prepare incoming emails. This is ideal when you want to set up a nested tag structure from scratch.
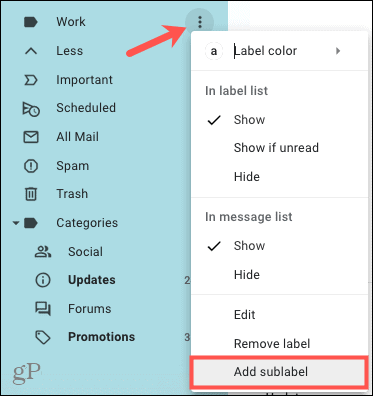
Click on the three points next to a label in the side menu and select Add subtag.
The popup has the nested tag box checked and the parent tag preselected in the drop down box. So just give the subtag a name and click Create.
You will see your new subtag below its parent in the side menu and next to the parent when you apply a tag. Again, this resembles a classic folder structure.
How to Color Your Labels in Gmail
Another way to use labels effectively is to color them. Since you can see the labels in the emails in your inbox, the colors can make specific labels stand out and be easy to spot.
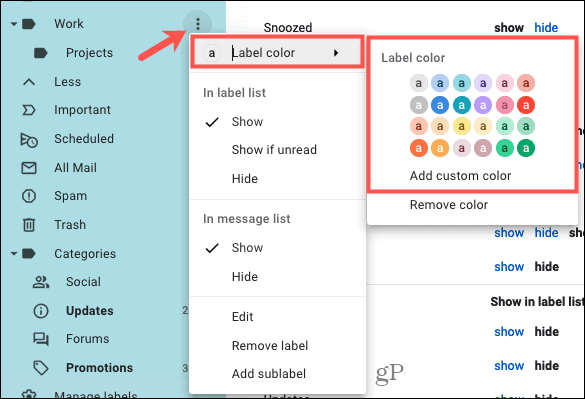
Click on the three points to the right of a label in the side menu. Move the cursor to Label color and choose a color from the drop-down menu. If you want to be creative, you can choose Add custom color and get the exact shade you want.
You will then see your colored label in the side menu, as well as in the email.

How to Color Nested Labels in Gmail
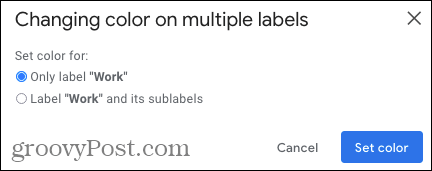
If the label you want to color is the parent of sub-labels, you have the option of applying the color to the parent or to all of them.
Follow the process above to select a color for the label. When the pop-up message appears, choose to apply the color only to that label or its sub-labels. Then click Set color.
How to Show or Hide Labels in Gmail
Another great feature of labels in Gmail is the ability to show or hide them. So while you can create a label to organize specific messages, you may only use that label from time to time. On the other hand, you may use a label on a daily basis.
You can access the Show and Hide actions from the side menu or from the Gmail Settings.
- In the side menu, click the three dots to the right of a label to display the context menu.
- In the settings, click the gear icon at the top and select See all settings in the sidebar. Select the tab Labels and scroll to the bottom under “Tags”.
Then you will see the options to Show, Hide or Show if it has not been read in the list of tags (side menu). And you have the options to Show and Hide in the message list.
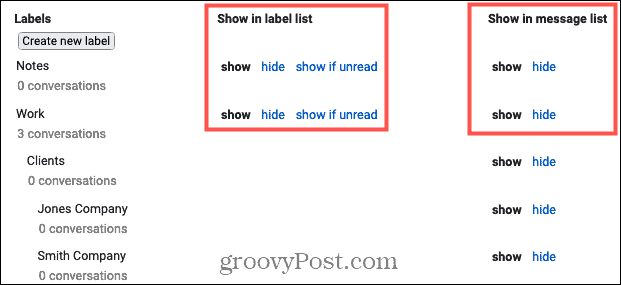
In the tag list
If you like a nice and neat side menu, you can choose to hide certain labels. This allows you to apply the hidden label to emails, but just not show the label in the list. An important note is that you can only hide the main tags in the tag list, not the sub-tags.
A useful option that you can check is Show if not read. If you select this option, you will not see the label unless it contains unread messages. So if you set up a filter to automatically apply labels to emails that meet a condition, this is a useful option.
In the message list
Although it is convenient to see the labels in the message list (inbox), you may have some that you do not need to see. You can simply hide them in your inbox.
Use Gmail labels to your advantage
Tags give you structure and a quick way to find the emails you want when you need them. We hope these tips help you get the most out of Gmail’s built-in tagging feature.

