
You often hear about saving storage on the iPhone or Apple Watch, but not necessarily on the Mac. Although computers tend to be a bit more generous than mobile devices when it comes to storage availability, there are times when you need to free up space. Here are different ways to free up storage on Mac.
Manage storage
Storage drives have become much more efficient over the years, as have available software tools that help in the same way. On Mac, Apple offers several tools to maximize local storage, while making iCloud compatibility available. It all starts with the automatic Optimized Storage feature in macOS.
When activated, the tool offers different features, including:
- Move files, photos, movies, email attachments, and other files that aren’t used often on your machine to iCloud.
- Despite the automatic movement of files to iCloud, you will still find the file in its original location. When you go to open it, the file will automatically download to its original location.
- Recently used files remain on your Mac, along with optimized versions of your photos.
Save space automatically
To get started:
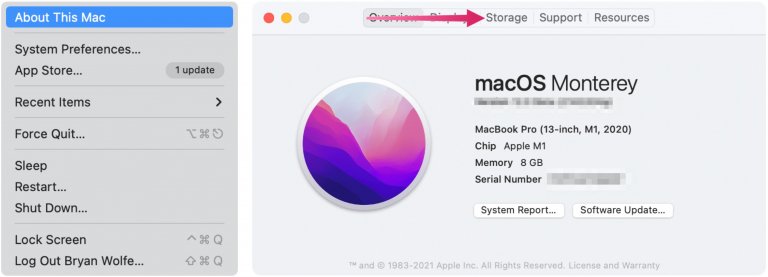
- Choose the apple icon at the top left of the menu bar.
- Please select About this Mac in the drop-down menu.
- Click on the Storage tab.
On the next screen you will see an estimate of the storage space used on your Mac by categories. You can see more details by moving the pointer over each segment.
Then click Manage.
From there, you can adjust four options that will maximize your Mac’s storage: Store to iCloud, Optimize Storage, Empty Trash Automatically, and Reduce Clutter.

- Store in iCloud move little-used files to iCloud automatically. When they are opened, they are downloaded to your computer again. You will most likely need a paid iCloud subscription to have enough online storage to perform this task.
- Optimize storage It removes movies and TV shows from Apple TV that you’ve already watched on Mac, and also keeps only the latest email attachments on your machine.
- Empty Trash Automatically Delete deleted items after they are in Trash for more than 30 days.
- Reduce clutter It gives you instant access to documents and other content stored on your Mac, making it easy to delete what you no longer need.
More on reducing clutter
Everything that is stored on your Mac is organized by categories in the Reduce clutter section. These categories include Applications, Developer (where applicable), Documents, iCloud Drive, Mail, Messages, Music, Music Creation, and Photos. You can drill down into each category to find the files you want to remove: right-click on any item to remove it.
The Reduce Clutter section also shows macOS and System Data; you cannot delete these files from this location.

Other options to free up storage on your Mac
With macOS Sierra and later, your Mac also automatically deletes the following types of files:
- Detects duplicate downloads in Safari, keeping only the most recent version of the download
- Reminds you to remove used app installers
- Remove old unused fonts, languages, and dictionaries
- Clears caches, logs, and other unnecessary data when storage space is needed
Apple also recommends performing the following tasks to remove storage manually:
- Delete music, movies, and other media as needed.
- Check the download folder and delete the items you no longer want.
- Move files to external storage device as needed.
- Compress files on your Mac.
- Lastly, delete the email that you no longer need.
- In the Mail app, select Mailbox> Clear Spam. If you no longer need the email in the Trash mailbox, select Mailbox> Erase Deleted Items.
A lot to see
Apple makes it relatively easy to remove content you no longer need from your Mac and free up storage. This way, you can add fun things like more music and video content.


 a Screenshot on Mac")
