
Cloning your Mac is an option that you may want to do on a regular basis. Although the Time Machine tool built into macOS does the job, it has some limits and is not very flexible. Recently, I found myself looking for an alternative backup solution for my MacBook Pro. Carbon Copy Cloner 6 is so good that I decided to write a guide on its use.
What is Carbon Copy Cloner 6?
Created by Bombich Carbon Copy Cloner 6 serves two purposes. It allows you to create a single clone of your entire Mac and take regular backups. Along the way, you’ll discover several features that Bombich says “I wish Time Machine would do (and more!)”.
Among them are:
- Flexible backup options allow you to create a backup to your external drive or another Mac, or just a single folder or an entire external hard drive.
- Snapshots allow you to recover files that you thought were lost forever.
- The application’s dashboard tracks the space consumed by snapshots on disks, while offering one-click access to start, stop, and monitor tasks, along with details on recent task activity.
- Scheduled backups mean that you can have your data backed up on your time, be it hourly, daily, weekly, or monthly. Additionally, you can assign scheduled backups to run only on weekdays, weekends, or at certain times of the day.
- Smart updates mean that only added or updated files are backed up.
- Receive notifications about backup processes through the macOS Notification Center or email, or both. It depends on you.
In addition to these features, I also found that Carbon Copy Cloner 6 is fast on both macOS Big Sur and macOS Monterey.
Cloning your Mac
There are different ways to clone your Mac with Carbon Copy Cloner 6. The following are a combination of tasks you should follow and best practices based on my experience using the software.
With Carbon Copy Cloner 6 installed:
- Open the software on your computer.
- Click where it says, “Click to select a source.”
- Choose your Mac startup disk. It’s probably called “Macintosh HD.”
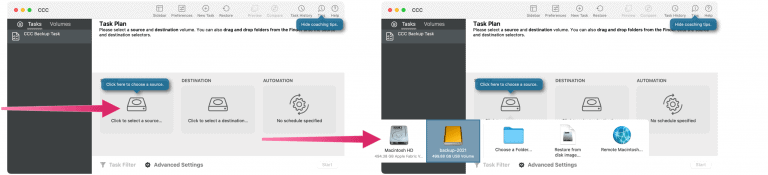
Next:
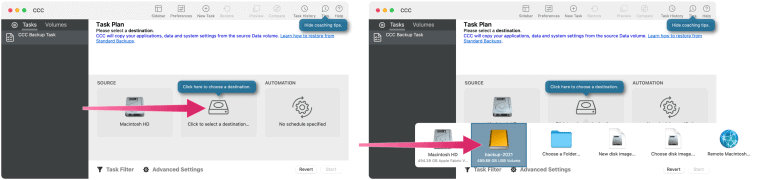
- Click where it says, “Click to select a destination.”
- You choose external disk.
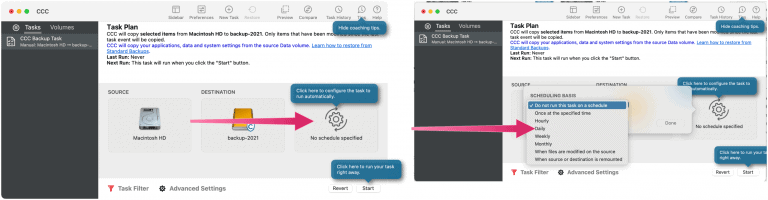
From there:
- Click on Automation.
- In the drop-down menu, select how often you want to back up your computer. Again, there are several options here. For example, if you want to perform a regular backup, select Daily or When source or destination is remounted (when the source or destination is reassembled).
Set your settings and restrictions
The next steps are to determine what happens during each backup and if files are excluded. For the first, you can choose:
- Repeat the process on a set schedule. (If you set “Daily”, it is already set to repeat every day).
- If you want to limit the task so that it only runs between certain hours of the day.
- Run the task immediately after the external drive reappears.
For the latter, you will want to select the Task Filter to exclude items from being saved through the backup process. In general, it’s important to back up everything, unless there’s a strong reason not to.

Once you are comfortable with backup and scheduling, click Save (Save) in the lower right.
Advanced tools
Carbon Copy Cloner 6 includes some advanced tools that are worth considering if you are the type of person who likes to delve into the workings of software titles. Otherwise, you are good to go at this point.
The most important advanced tools that I have discovered are:
- The Preview: By clicking the preview button at the top, you can have Carbon Copy Cloner 6 run your backup without actually copying the files. Use this to make sure there won’t be any errors when you run the actual backup.
- Snapshots: They are designed to recover files as they were at any given time. You should create snapshots frequently if you are in the habit of updating files on your computer often. But snapshots can take up a lot of space on your external drive, so be sure to set a retention schedule.
Worth considering
Carbon Copy Cloner 6 is free to try for 30 days. Thereafter, it costs $ 40 or $ 20 to upgrade. It’s a great tool if you want to take your Mac cloning to more advanced levels.
For more information, visit the website of Bombich.


 a Screenshot on Mac")
