This publication shows students and new users the steps to configure a hard disk and partition it when using Windows 11. Windows allows users to create partitions on the hard disk to better manage data and improve performance in some cases.
A new computer can come with a single hard drive and one or more partitions. If you connect a new hard drive to your computer, it will usually be attached with a single partition. You can create as many partitions as your system or drive allows. But you don’t want to do that in a normal situation.
In most cases, one or two partitions on a hard drive is reasonable when you want to create separate partitions in Windows so that the unique data is on your only partition and does not share the same partition with the operating system.
In Windows, a partition that you create is called drives and generally has a letter associated with it. You can create, shrink, resize partitions, and more.
To get started creating and managing partitions in Windows 11, follow the steps below.
How to create a partition in Windows 11
As mentioned above, partitions can be created from the system hard drive. A hard drive in Windows will have only one partition. That single partition can be shrunk, resized to create additional partitions on the hard drive.
The steps below show you how to do it in Windows 11.
First, click on the Start menu and type Create and format hard drive partitions, under Best Match, select the highlighted application to open the control panel.

The Windows Disk Management Tool should look similar to the image below. Disks that have not yet been configured are displayed as Not initialized and Not assigned.

Windows will ask you to initialize a new hard drive that has not been initialized. Click the OK button when prompted, as shown above.
Once the hard drive is initialized, you can start creating partitions. Windows 11 supports GPT, so you can choose that option. By default, MBR is selected, and if you are unsure whether the drive you install supports GPT, MBR should be sufficient.
If you are configuring a drive or partition larger than 2 TB or want to use the latest partition style, select GPT.
How to create a new simple partition in Windows 11
On a drive initialized with Not assigned partition, right-click and select New partition or New single volume of the displayed option.

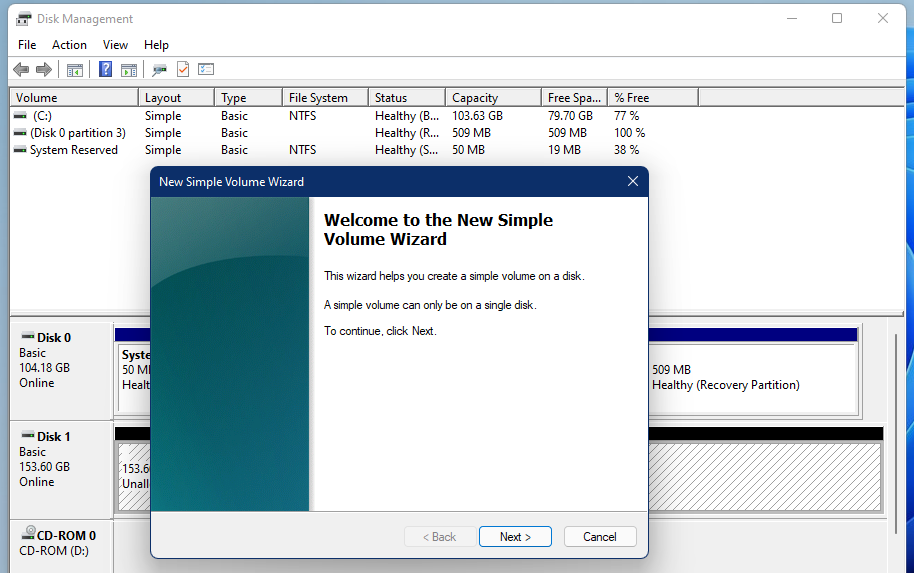
A Simple New Volume Wizard opens. Click Next to start setting up a new partition.

Specify the size of the partition you want to create and click Next. Partition or volume size is the size is the maximum capacity in MB of the drive. By default, it will create a partition to use all the space on the drive.
If you want to create multiple partitions on the drive, you will need to specify an amount that does not use all the space on the hard drive.

Select a drive letter for your new partition and click the Next button.

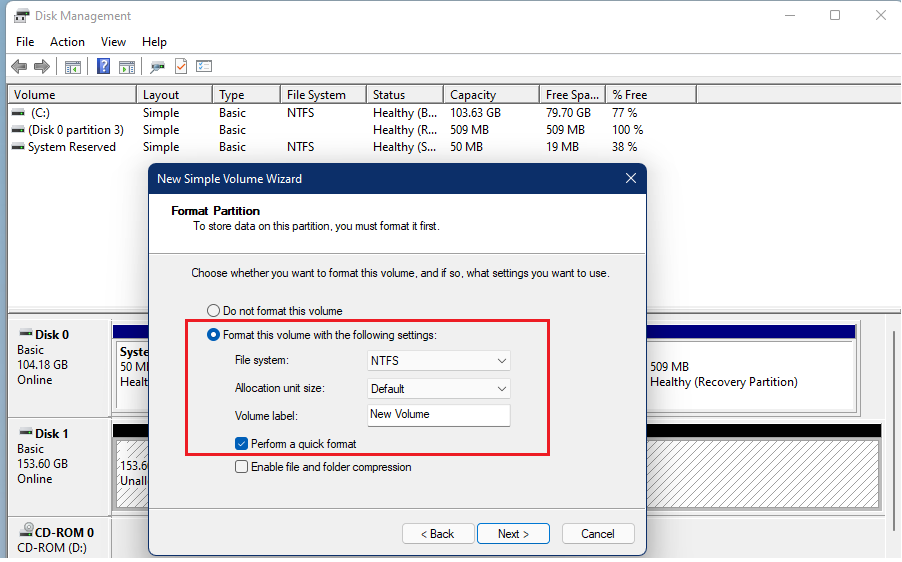
Make sure the drive format is NTFS, change the volume name (optional), and click the Next button.

Click the Finish button to complete the wizard.

Once complete, the new partition should appear in Disk Management.

You should do that!
Conclusion:
In this tutorial we have seen how to create a partition in Windows 11. If you find any errors above or have something to add, use the comment form below.


