This post shows students and new users the steps to create a Windows 11 ISO file for unsupported hardware. Windows 11 official ISO files will not install on unsupported PCs. However, with the help of Rufus, a utility that helps format and create bootable USB flash drives, you can now create ISO files that bypass TPM and Secure Boot checks to install Windows.
You can create an ISO file to install on hardware that does not meet Windows requirements; however, you must have a product key or activation key to use it. If you don’t have a valid product key, you won’t be able to use Windows 11.
There are no free versions of Windows 11.
You will need Windows 11 ISO and use Rufus to create a modified ISO that works with unsupported hardware.
To download the Windows 11 ISO file, go to Download Windows 11 ISO and scroll down until you see the ‘Download Windows 11 Disc Image (ISO)‘ section.
There, click on the Select Download drop down and choose Windows 11.
How to Windows 11 on older PCs
As mentioned above, Windows 11 as direct hardware requirements. However, if your PC doesn’t meet these requirements, you can use Rufus to create a Windows 11 ISO file to bypass these requirements and install it on unsupported hardware.
Once you’ve downloaded the official Windows 11 ISO, go to the link below and download the Rufus (beta) version.
Index of / downloads (rufus.ie)
Future versions may be different.

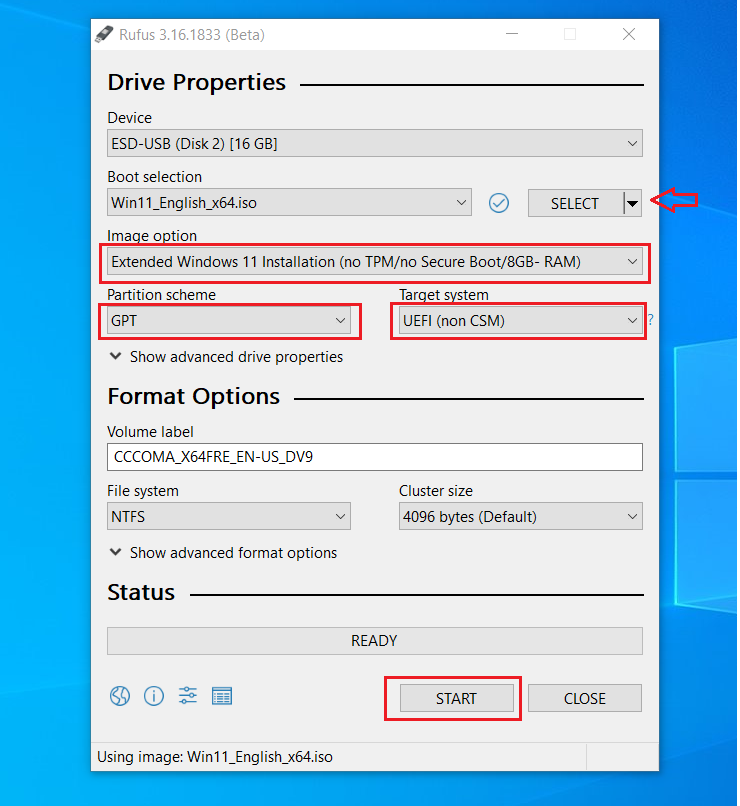
After downloading, open Rufus, then insert the USB drive you want to use to create the ISO image. Next, find the official Windows 11 ISO file and select.
Then use the options highlighted in the image below to match yours.
- Image option: Windows 11 Extended Install (No TPM / No Secure Boot / 8GB – RAM)
- Partition scheme: GPT
- Target system: UEFI (not CSM)

Once the settings are correct, click the START button to start creating the ISO image for unsupported PCs.
Wait for the process to complete, then eject the USB drive and use it to install Windows 11.
You should do that!
Conclusion:
In this tutorial we have seen how to use Rufus to create a bootable USB drive to install on unsupported PCs. If you find any errors above or have something to add, use the comment form below.


