This post shows students and new users the steps to delete the Windows.old folder after upgrading to Windows 11. If you have successfully upgraded to Windows 11, Windows will create a Windows.old folder on the system drive.
This Windows.old The folder contains your old Windows installation files and other system data from your old operating system. Windows uses the Windows.old folder for easy installation rollback. If you’re comfortable with Windows 11 and don’t think you’re going to go back, deleting the Windows.old folder should be safe.
One of the reasons most people would want to delete this unused folder is because it is quite large and deleting it will free up some storage space on your computer.
Windows 11 also built-in drive optimization task will eventually delete the Windows.old folder, however you can manually delete it to see immediate benefits without waiting for Storage Sense to clean up the folder.
To manually delete the Windows.old folder, follow the steps below.
How to manually delete the Windows.old folder after upgrading Windows
As mentioned above, Windows automatically creates a Windows.old folder after a successful upgrade to another version. If you have recently upgraded to Windows 11, you can follow the steps below to manually delete that folder.
First, open File Explorer and find the Windows.old folder.
In File Explorer, find the Local disk (C 🙂. If you click on the This PC folder in the left navigation window, you will get there quickly.
There, you should see the Windows.old folder along with the standard folders in Windows 11.

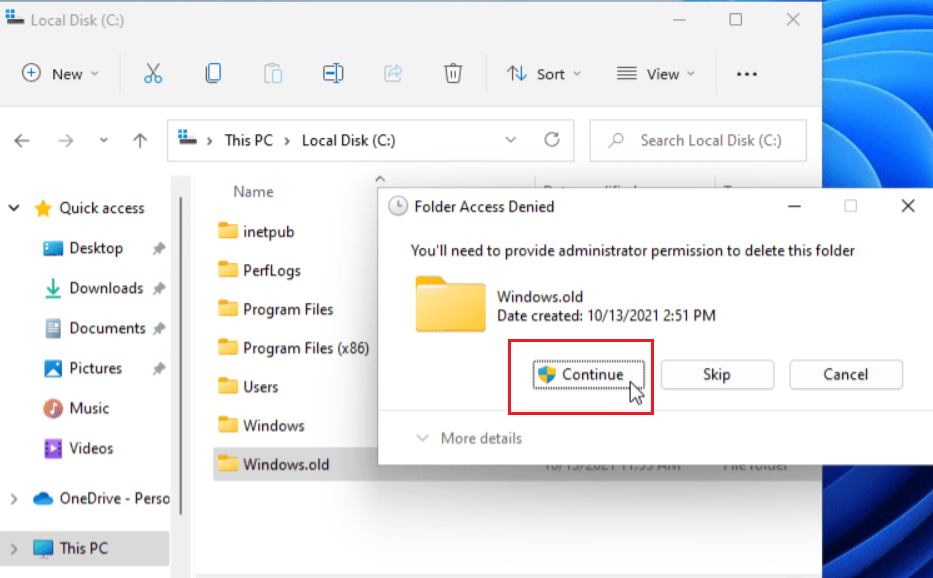
Assuming you are happy to delete the Windows.old folder, right-click the folder in File Explorer and press Delete to proceed.
Windows will show you a message that you will need administrator permission to delete the folder. If you are logged in as an administrator or a member of the administrator account, just click Continue.

How to use the Disk Cleanup tool to delete the Windows.old folder
You can also immediately delete the Windows.old folder by using the Disk Cleanup tool in Windows 11.
First, click on the Start Menu, then search Disk cleanup, for Best Match, select Disk cleanup application as shown below.

When the Disk Cleanup window opens, press thebutton. Clean system files button at the bottom.

The Disk Cleanup tool may take a few minutes to scan your computer for unused files, depending on the speed and size of your hard drive.
After the tool finishes scanning your disk, it will display the items that you can safely remove from your disk to free up space. In the list you should see the Previous Windows installations element that is the content of Windows.old.

You can mark all the items you want to delete. It is safe to check everything and click the OK button. You will receive a message to confirm that you want to delete the files.

You may also receive a second message to confirm that you want to delete the Windows installations or the temporary installations file. Click Yes to confirm and delete.

You can also configure Storage Sense to automate this process and clean old and temporary files in Windows 11. The following post shows you how to use Storage Sense in Windows 11.
How to use Storage Sense in Windows 11
You should do that!
Conclusion:
In this tutorial we have seen how to delete the Windows.old folder in Windows 11. If you find any errors above or have something to add, use the comment form below.


