On many occasions having an on-screen keyboard at our disposal comes in handy, especially if we are running Windows 11 on a computer that has a touch screen. For this reason, we want to teach you how to enable virtual or touch keyboard in Windows 11.
Doing so is quite simple, it can even serve us temporarily if by any chance we break everything or some keys on the physical keyboard. It is a good way to get out of trouble and it is ideal as we mentioned earlier, in case you have a touch screen.
Enable virtual or touch keyboard in Windows 11
Activating the virtual or touch keyboard in Windows 11 is an extremely simple process that we can perform in a matter of a few minutes. If we enable an icon on the taskbar, then we can show the touch keyboard at any time.

The first thing we will have to do is right click on an empty area of the taskbar and select “Taskbar settings”.

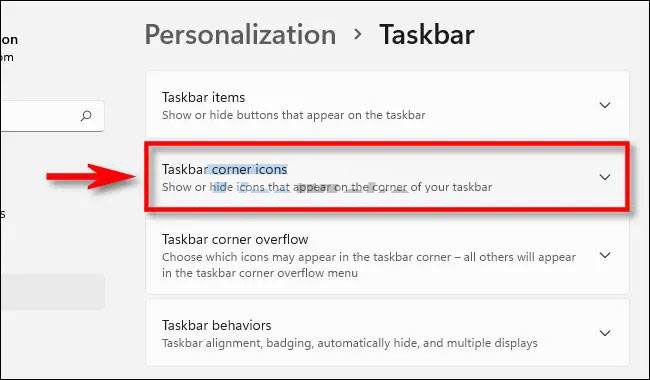
After this we will have to go to Personalization> Taskbar in the Windows 11 Configuration application. In this section, we will have to click on “Taskbar corner icons” to be able to see all the options.

We will have to click on the switch on the right side of “Touch keyboard” to activate it.

An icon will appear in the lower right corner of the taskbar immediately.

If we click on this icon, a virtual keyboard at the bottom of the screen, above the taskbar.
How to disable the touch keyboard in Windows 11
To be able to deactivate it is too easy, basically we will have to repeat all the steps that we mentioned previously, only now we will have to move the switch of “Touch keyboard” in the section of “Icons in the corner of the taskbar” so that it remains gray, bone deactivated.
In this way we have managed to disable the virtual keyboard of Windows 11. As you can see, activating or deactivating it is extremely fast and easy.


