
Solve problems related to DNS on Windows 11 and 10 It is something extremely easy and we have several methods to achieve it. The important thing is to know the real cause of the problem in order to apply the correct method. We’re going to find out more about it below so you can quickly fix this issue.
What are DNS?
Obviously the internet does not understand words, it does not understand our language. When we enter a web address to enter a site, the browser passes it to a DNS server that converts it into a number value; this would be the IP address of the website, so it can be readable. When the DNS (domain name system) stop converting url to numeric value, We found DNS problems in Windows 11 and 10 as the server is not responding. Basically, any problem we have with the DNS, it will not allow us to enter any website.
How do we know if the problems to be solved come from the DNS server in Windows?
If the problem comes from the DNS server, then we will not be able to access the website from the URL; but we can do it by entering the IP address of it. For instance, Google has the IP of 172.217.4.46If we copy said IP in the address bar of the web browser, we will enter Google.com.
How to fix DNS problems in Windows 11 and 10
We are going to look at various methods of trying to troubleshoot almost any kind of DNS server problem.
Check if we have problems with the ISP
The ISP is the internet service provider that we have contracted. The first thing we have to do is check if other devices connected to the same network have problems. If the other devices are working properly, the ISP is working properly and the problem is with the computer.
Switch to Google DNS servers
This is something very simple, but most of the time it works when we have problems related to DNS. We will have to press Windows + R to open the run window and we will have to enter “ncpa.cpl” without the quotes and press “Enter” to open the “Network Connections” window.
Then we will have to right click on our connection and among all those options, we will choose “Properties”. We will do the same in this new window, we right click on “Internet Protocol version 4”.
We are going to mark the option “Use the following DNS server addresses”And we are going to put the Google addresses.
- Preferred DNS server: 8.8.8.8
- Alternate DNS server: 8.8.4.4
We accept the changes and wait a few minutes, then try again to enter the website that was causing us problems.
Modem, router and computer
One thing we can try is to turn off the modem, the router, and the computer. Once they are off, we wait a few seconds and then turn on the modem only, we wait 3 minutes until the router light is stable. Then we will proceed to start the computer.
Renew IP, Empty DNS and reset Winsock
The solution that we are going to propose is through the elevated Command Prompt. We will have to click on “Start” or press the “Windows” key and type “Command Prompt”, in the right panel we can click on “Run as administrator”, a pop-up window will appear where we will have to click on “Yes” to confirm.
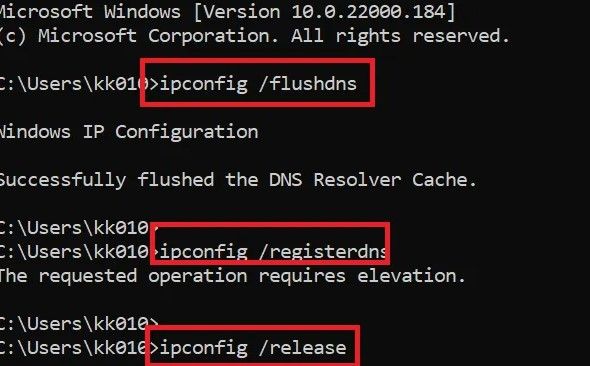
In the Command Prompt window, we are going to have to copy and paste these commands; once pasted in said window, we press Enter to execute them:
ipconfig / flushdns
ipconfig / registerdns
ipconfig / release
ipconfig / renew
NETSH winsock reset catalog
NETSH int ipv4 reset reset.log
NETSH int ipv6 reset reset.log
Exit
What does this? Renew the IP, clear the DNS cache and it will restart Winsock.
A clean reboot of the operating system
Another option that allows us to solve this problem is to perform a clean boot of the system in order to isolate the cause if the condition is caused by third-party software products. Basically we have to start the computer in safe mode.
Enable Microsoft LLDP Protocol Driver
In order to activate Microsoft’s LLDP protocol driver, we are going to have to do the following.
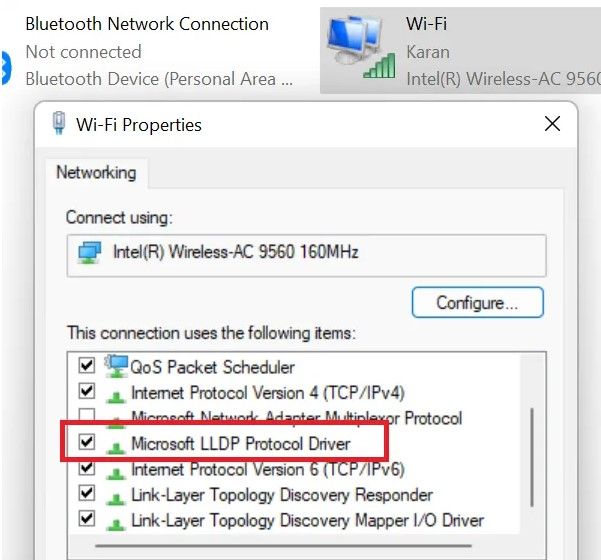
First we press Windows + R to open the run window. Next, in this window we will write “ncpa.cpl” without the quotes and press “Enter”. Now we will right-click on your active network connection and we will have to select “Properties” from the context menu.
Once this is done, we will have to go to the list of “This connection uses the following elements” and we will have to mark the one that says “Microsoft LLDP Protocol Driver” or “Microsoft LLDP Protocol Driver”. Then we click “Accept” and that’s it.
Update network drivers
Obviously outdated drivers can cause a lot of problems, more than you can imagine. It is always important to update your operating system drivers. Therefore, visit the website of the manufacturer of your network controller and make sure you have the latest version available.
Change power plan
The balanced power plan is the one that is generally preconfigured on all computers. But if we have problems, we can try to switch to the high-performance plan so as not to have any kind of restriction.
For this we will have to press Windows + R and in the run window we will write “powercfg.cpl” without the quotes and we will enter Power Options. Just select High Performance and you’re done.


