
The vast majority of external microphones are plug-and-play. This means that they do not need drivers or specific software to work, we can use standard audio drivers. However, it may happen that we have some other problem to make it work. Today we are going to present you several solutions when Windows 11 and 10 He does not recognize the microphone.
Windows does not recognize the connected microphone
In order to solve this problem we are going to have to try several methods, they do not have to be executed in order.
Run the audio recording troubleshooter

The audio recording troubleshooter is a tool that allows us to check if there are problems with the microphone. The procedure to be able to execute it is very simple and fast.
The way to enter and run the audio recording troubleshooter varies slightly between versions of Windows, let’s see how we can run it from Windows 10.
- We will have to press “Windows + i” to be able to enter Settings> Updates and security> Troubleshoot> Additional troubleshooter.
- In this section, we will have to find the audio recording troubleshooter and run it.
In the event that we want to do it in Windows 11, we must follow these steps.
- Right click on the “Start” button and go to Settings> System> Troubleshoot> Other troubleshooters.
- Next, we will have to select “Run”, which corresponds to the audio recording troubleshooter.
Update drivers
Obviously a driver that is not updated can malfunction. There is a good chance that the problem is this. No drivers that work properly and are up-to-date, Windows cannot recognize the devices connected correctly.
We are going to have to go to start and type “Device Manager”, we look for the microphone or device that is not recognized, we right click it and we can “Update driver”. Another option would be to go to the microphone manufacturer’s website and download the drivers.
Disconnect other peripherals
Sometimes having several peripherals connected to the computer can cause several problems for Windows to detect the microphone. Try disconnecting all the peripherals that are not really necessary, restart the computer and reconnect the microphone.
Allow applications to access the microphone
Obviously it is essential that we allow applications to access the microphone, otherwise it will not work. To verify that it has permissions, we are going to do the following:
In Windows 10 we will have to do it this way.
- Click on “Start” and we will have to go to Settings> Privacy> Microphone.
- We will have to enable the switch associated with allowing applications to access the microphone.
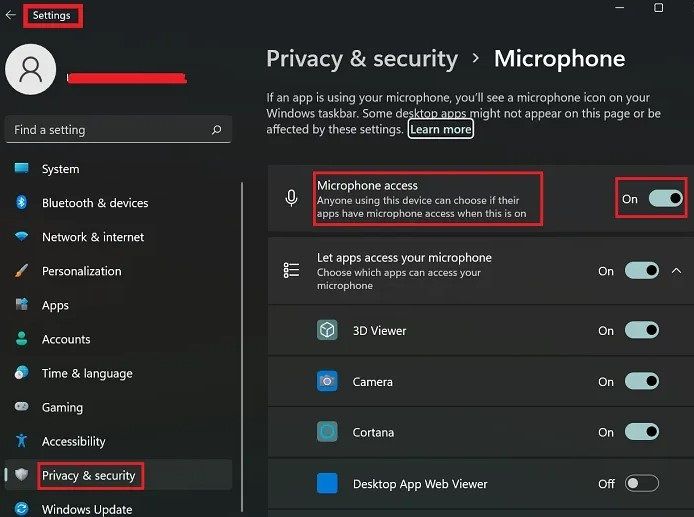
In the case of Windows 11 we will do it like this:
- We right click on the “Start” button and then go to Settings> Privacy and security> Microphone.
- We will have to activate the switch that allows access to the Microphone.
Check if the microphone is enabled
Another thing that we must consider is that the microphone is enabled.
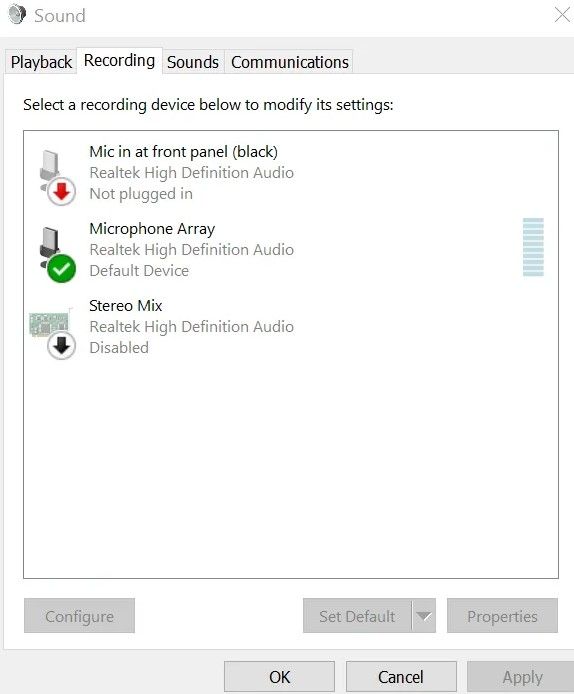
- For this we are going to press “Start” and we are going to write “Control Panel”.
- Next, we are going to go to “Sounds” to be able to open the sound properties window.
- Here we will have to go to the “Recording” tab at the top.
- We will right click on an empty space and select “Show disabled devices”.
- If the microphone is disabled, then we will have to activate it.
As you will see, solving the problem that Windows 10 and 11 does not recognize the microphone is quite easy and we have several methods to solve it.


