")
After installing a cumulative update from Microsoft through Windows Update, your system may be unstable or completely unusable. There are several reasons why this can happen, but many of the fixes are the same, regardless of the cause.
If Windows 11 doesn’t work after an update, you can try these solutions.
1. Restart your PC
After taking an update, your PC will normally restart automatically or at a time of your choosing using Active Hours. Sometimes an update does not install completely, even after restarting the first time. You may have to restart Windows 11 manually to solve the problem.
To restart, right-click the Start button and click Shut down or log out> Restart. During the restart, you should see a message that Windows is applying the update. Log in afterwards, your system should be working again at this point.

2. Uninstall the update
If you find that Windows 11 is acting up after a recent update, one thing you can do is uninstall it. Removing the update will give Windows another chance to install it successfully, or it may delay installing the new update until it identifies the problem with it.
For uninstall a cumulative update in Windows 11, press the menu Beginning and press Setting. From there, press Windows Update> Update history> Uninstall updates.
Select the most recent update, which appears with ID values such as (KB5005537). When you’re ready, press the button Uninstall.
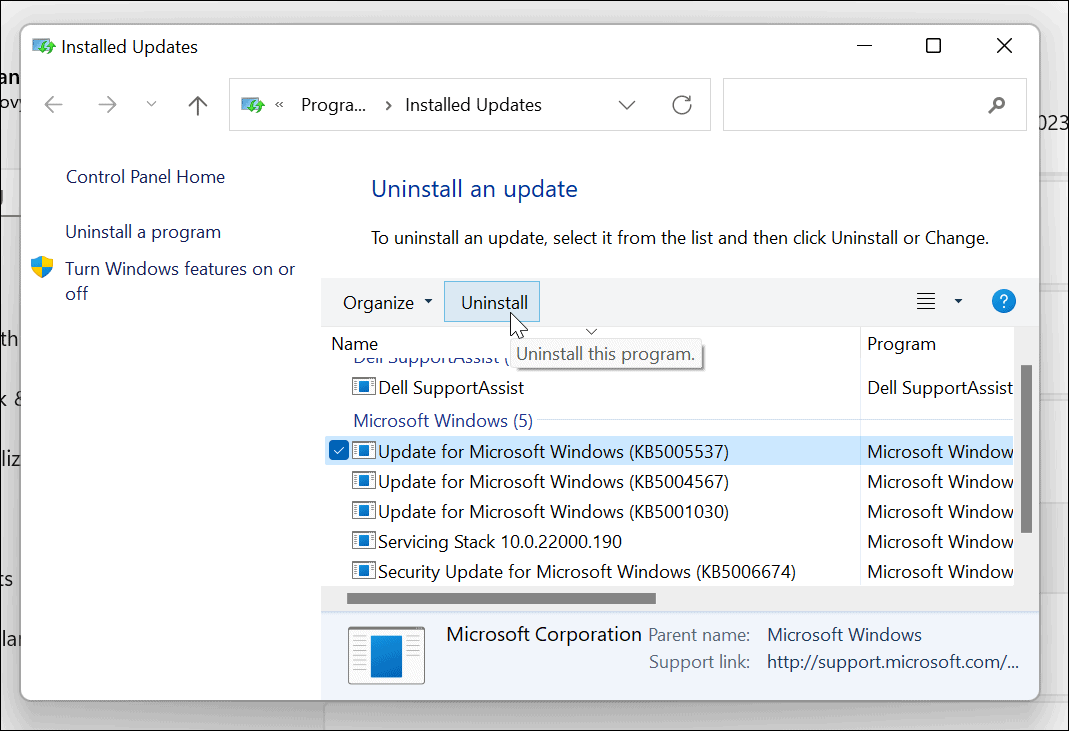
Follow the additional instructions on the screen to complete the process, and then restart your PC.
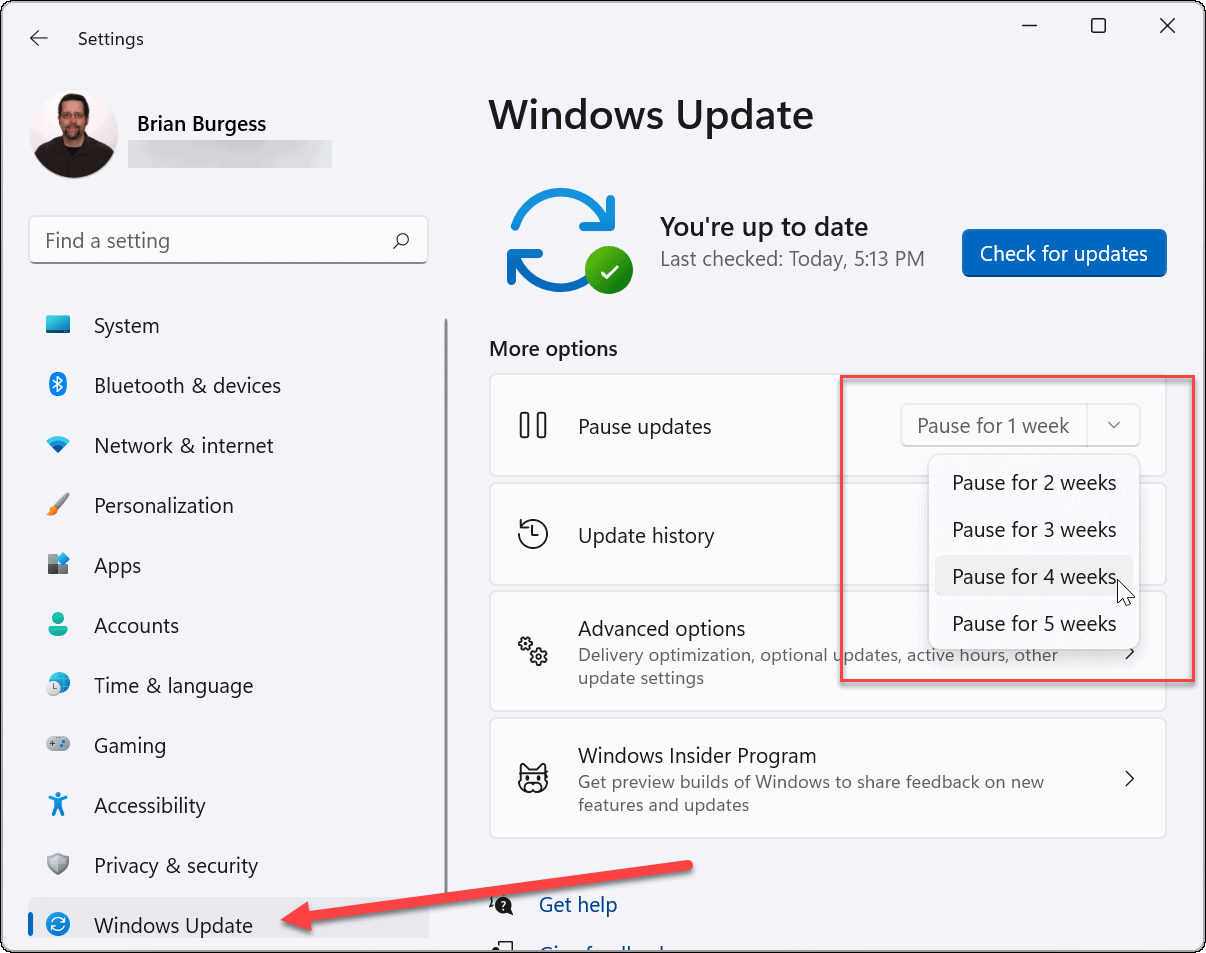
3. Pause updates
Once you have removed a problematic update, you should temporarily pause Windows 11 Updates. This will give you time for Microsoft to publish a solution or for you to find a workable solution.
To pause updates, press Home> Settings. On the menu Setting, press Windows Update> Pause updates, and then click the button Pause You can choose to pause updates for a period of one to five weeks.
4. Reinstall the update
If you are sure the buggy update is fixed, you can try install updates manually.
To do this, go to Beginning > Setting > Windows update and click the button Search for updates. Install the available update (s) and reboot your machine.

5. Run the Windows Update troubleshooter
You may get an error message when you try to update your PC. This error will come with an identification value made up of a random selection of letters and numbers, such as “Installation error – 0x800f0831” or similar. If you can’t find a solution to this specific error message with a quick Google search, try running the Windows Update Troubleshooter.
Go to Start> Settings> System> Troubleshoot> Other troubleshooters and click the button Run Windows Update.
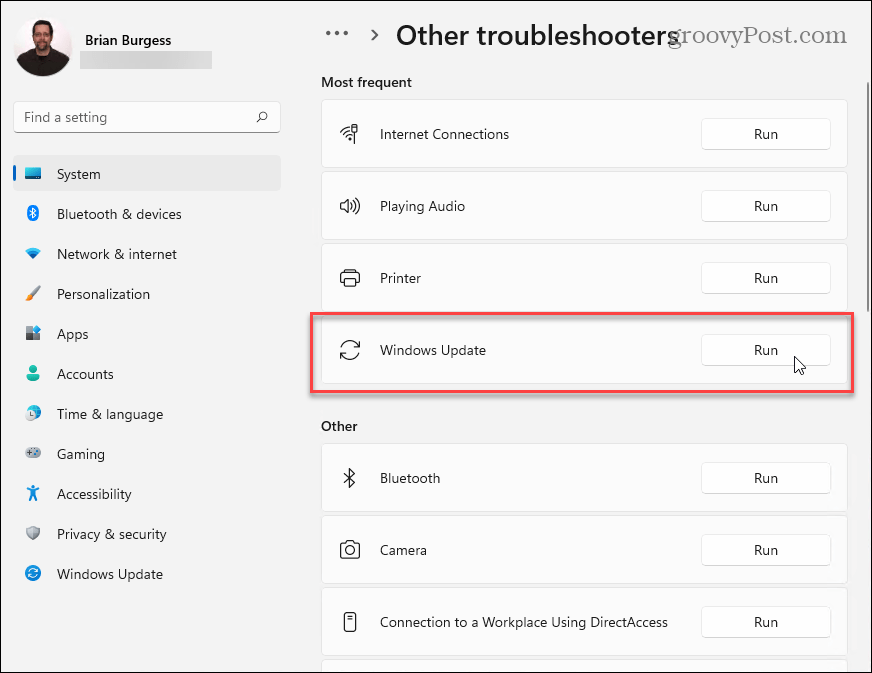
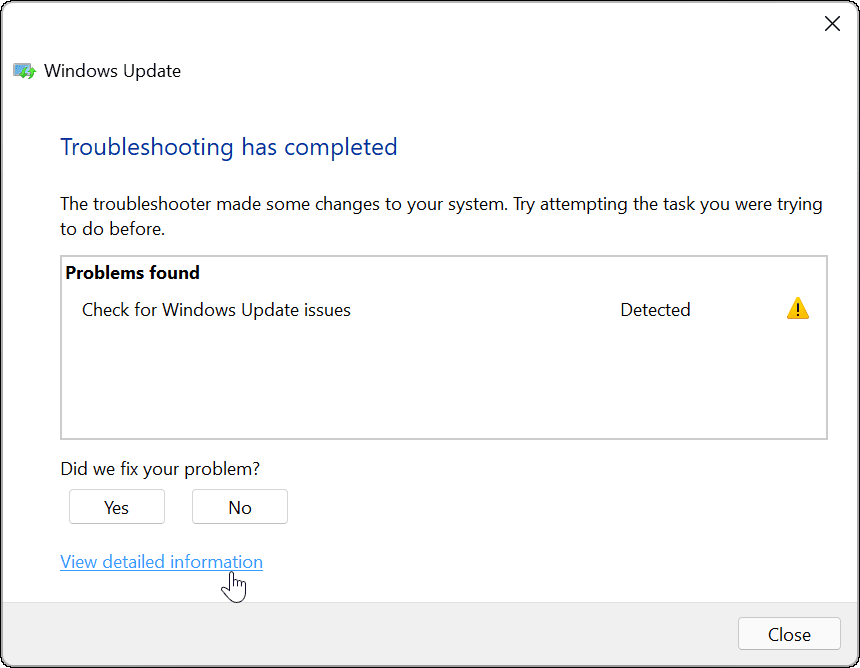
The troubleshooting wizard will try to find and resolve Windows Update problems. After the scan is complete, check again for updates.
6. Disable your antivirus software
If you are using a third-party antivirus solution and not Windows’ built-in security suite, you may have rare issues with updates. Although this type of software should not interfere with Windows system processes, it does happen sometimes.
Try disabling third-party antivirus software temporarily while installing updates. Each software package varies, so you will need to consult the antivirus software vendor’s website to determine how to do this.
Although highly unlikely, you can also temporarily disable Windows Security real-time protection if you suspect that it is blocking updates from installing properly. However, we recommend that you reactivate the protection immediately after you have finished.

7. Search for malware
Viruses, malware, and other digital items can prevent your Windows PC from working properly. This includes important system processes like Windows Update.
If you are sure that the antivirus you are using is not the problem, use your antivirus or antimalware solution to scan your PC for infections. If your PC has a virus or malware infection, you will need to resolve it before trying anything else.
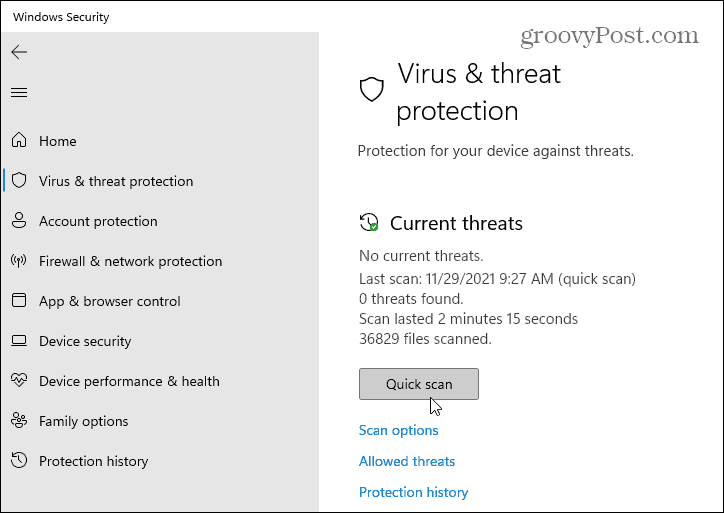
In Windows 11, click the Start button and type Windows Security, then select the top search result. Then go to Protection against viruses and threats> Quick scan.
For a full scan, go to Virus and threat protection> Scan options and choose the type of analysis you want to perform. For example, you have the opportunity to run a full scan of your PC, perform a custom scan of certain files or folders, or run a boot-level scan offline.
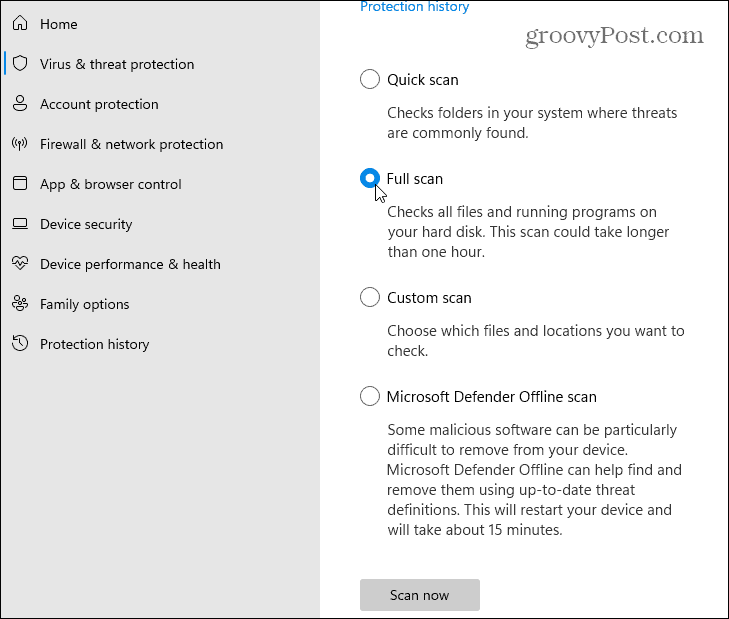
Note that a full scan and Microsoft Defender offline scans take longer, but they can identify and remove malware that is buried deep within your system.
8. Run DISM
Windows Update is not perfect. If an update is interrupted in any way, or the update itself has errors, your Windows installation could get corrupted.
You can repair your installation manually. The first step is to run the tool Deployment Image Service and Management (DISM) on your PC. DISM creates a new image of the system, giving you a local copy of the Windows files that you can use to repair your installation using the tool System File Checker (explained later).
To run DISM, right-click the Start menu and select Windows Terminal (Administrator). In the new Terminal window, enter the following command and press Enter:
DISM /Online /Cleanup-Image /RestoreHealth

9. Run the System File Checker (SFC)
Once you have run the DISM tool and updated your local source of Windows system files, you will need to run the tool System File Checker (or SFC). This tool scans your Windows installation for corrupted files and resolves them automatically, using the image created by DISM as the updated file source.
To run the SFC, right-click the Start button and select the option Windows Terminal (Administrator). Click Yes if the prompt box appears. UAC dialog.

Then when the terminal opens, copy and paste the following command and hit Enter:
sfc /scannow
This process may take a while. When done, restart your PC and check if the Windows update problem has been fixed.

10. Boot into Safe Mode and Troubleshoot
If Windows 11 doesn’t work after an update, you may need to start safe mode. Safe mode will only load what is necessary for Windows to work. It does not load graphics or sound card drivers and limits startup services to the minimum necessary for your PC to boot.
This environment gives you more ability to reduce a problem. For example, a component recently installed on your PC could conflict with a new update.
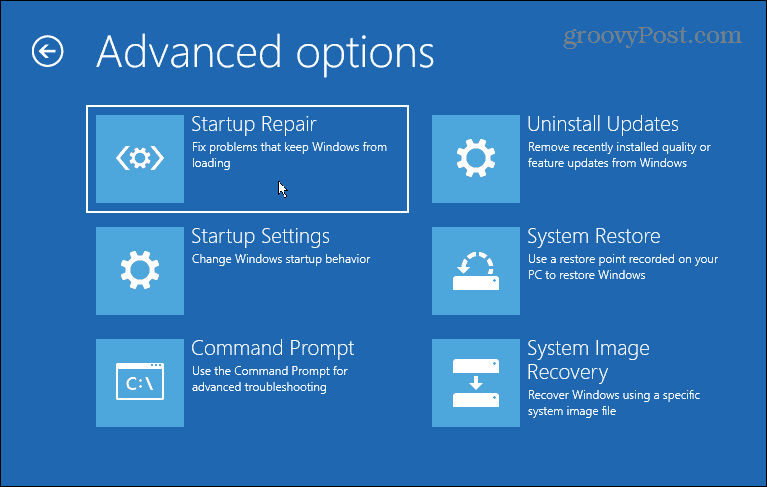
To boot into safe mode, press Home> Power on. Hold down the Shift key on your keyboard and click Restart at the same time. The PC will load the environment Advanced Recovery.
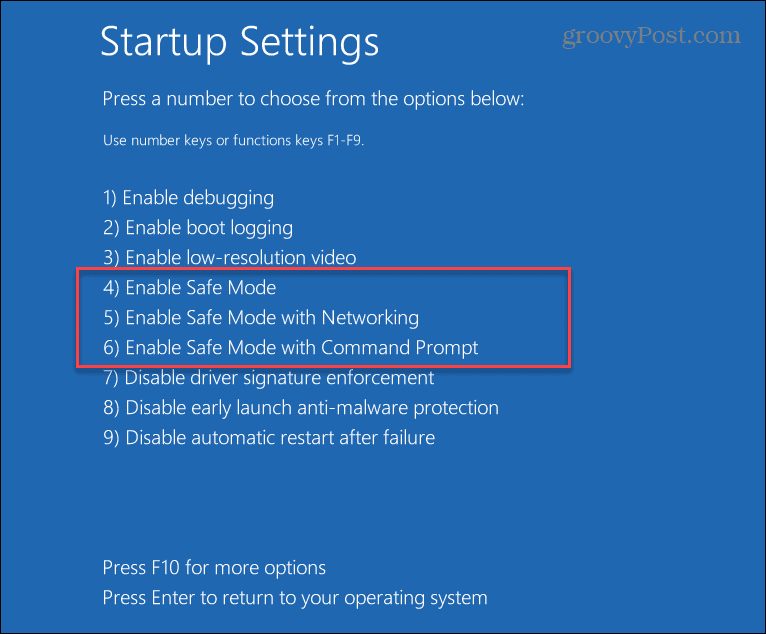
Click on Troubleshoot> Startup Settings> Restart to continue. Next, you will have to choose how you want to boot into safe mode, which includes options to boot with or without a network. You can also choose to boot with a basic desktop that displays a command prompt window.
11. Restart Windows 11
If you’ve run out of ideas, it may be time to reset your PC. You can reset your Windows 11 installation to restore its factory settings.
You will have the option to keep your personal files, but applications and settings will be removed. You can also decide to erase everything and start over with a completely fresh Windows installation.

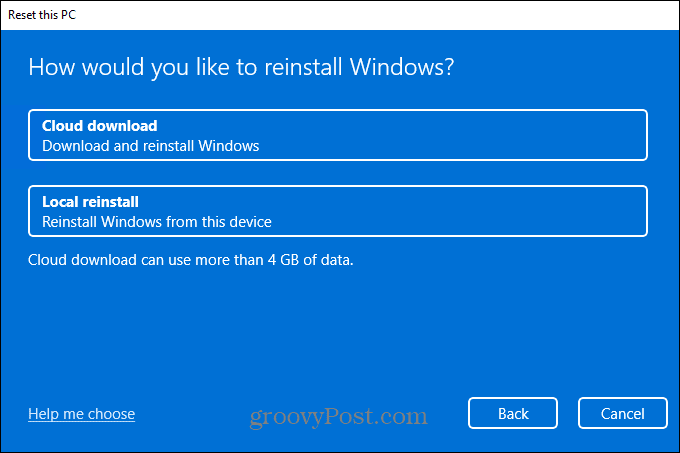
When you decide to reinstall your PC, you will also be given options to choose your preferred source of Windows installation files.
The option of Cloud download Download a fresh copy of Windows 11 from Microsoft’s servers before reinstalling it. The option of Local reinstallation Reinstall Windows 11 from a secret source of hidden Windows installation files on your device’s local drive. It also restores any OEM software that came with the PC.
12. Perform a clean install of Windows 11
If our other tips don’t work, you can always do a clean install of Windows 11. You can try this if you suspect there is a hardware failure (like a failing hard drive), for example. Once you have repaired or replaced your PC hardware, you can reinstall Windows 11 with a clean installation.
Performing a clean install should be considered a “last resort,” but it allows you to start over. Make sure you have a Windows 11 bootable USB installation drive or one Windows 11 USB recovery drive first, and then boot into environment Advanced recovery.
Keeping Windows 11 up to date
If Windows 11 doesn’t work after an update, don’t panic. Hopefully, one of the solutions above will help you resolve any issues you are having with a troublesome Windows update.
Remember that if your PC has problems, it is not always a software problem – make sure your PC hardware and peripherals are working properly. For example, if you have Problems with the keyboard, there are some common tricks you can try to fix the problem. The same is true if the problem is localized to a single key, such as a broken windows key.


