 Spell Checker in Microsoft Word")
The spell checker built into Microsoft Word can be a very useful tool for finding those hard-to-miss mistakes. If you turn it on, Word checks your spelling as you type and provides an indicator of misspelled words.
However, that red, checkered line can be distracting. You may see her and correct the word immediately, or you may decide to let her stare at you as you continue. In either case, the misspelling indicator can cause you to lose focus.
Luckily, you can turn off Microsoft Word’s automatic spell checker and check your spelling after completing the document. This prevents you from being distracted and allows you to review your document when you are ready. Here’s how to do it.
How to turn off the spell checker in Word in Windows
To turn off the spell checker in Word on Windows:
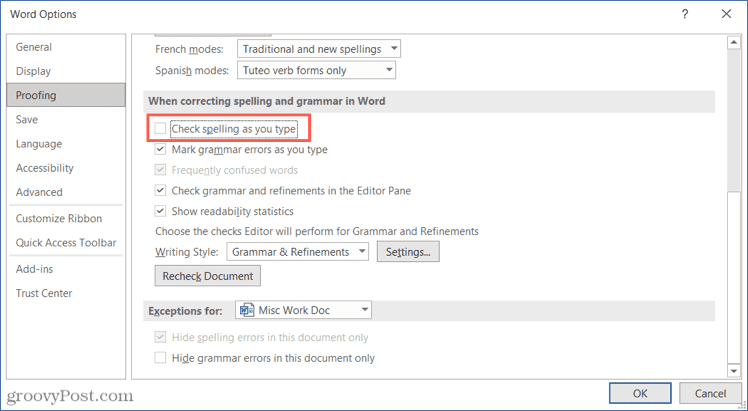
- Open your document and press File> Options.
- Please select Revision On the left side.
- Go to the section “To correct spelling and grammar in Word” and uncheck the box for Check spelling as you type.
- Optionally, you can uncheck the checkbox Mark grammar mistakes as you type just below.
- Click on To accept to save the changes.
How to manually check for errors in Word on Windows
When you’re ready to run the spell check manually, you can do it in two easy ways.
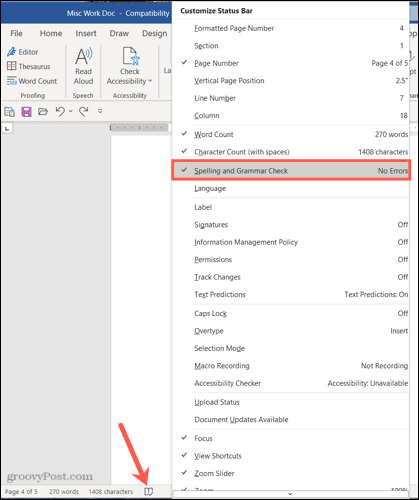
If you have the spelling and grammar check icon on the status bar at the bottom of the Word window, click it.
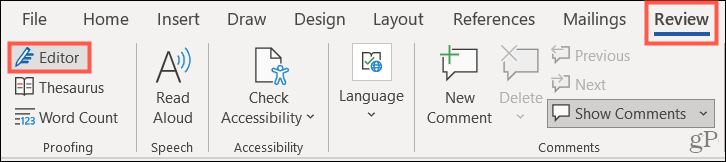
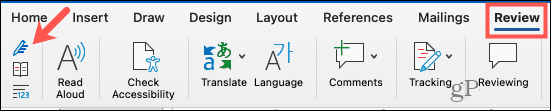
You can also go to the tab Revision and click Editor at the top left of the ribbon.
How to turn off the spell checker in Word on Mac
To turn off the spell checker in Word on Mac:
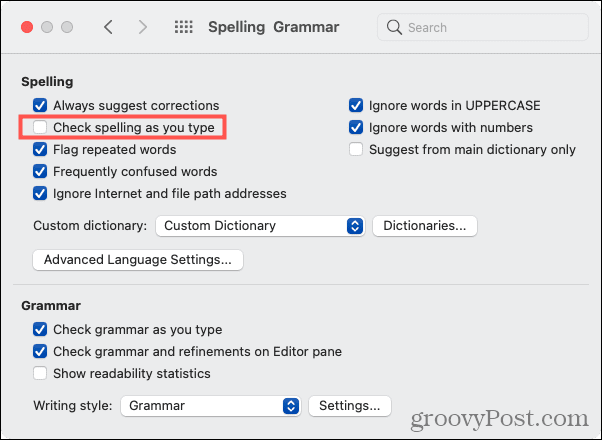
- Open your document and press Word> Preferences in the menu bar.
- Click on Spelling and Grammar.
- In the Spelling section, uncheck the box for Check spelling as you type.
- If you want, you can also stop the grammar check as you work by unchecking the checkbox for Check grammar as you type in the Grammar section.
You can then close the Word Preferences window. At this point, spell checking should be off, and you shouldn’t worry about wavy red lines appearing as you work on your document.
How to Manually Check for Errors in Word on Mac
When you are ready to run spell check manually in Word on Mac, you can use methods similar to those mentioned above for Windows users.
Click on the spelling and grammar check icon from the status bar or go to the tab Revision and click Editor on the tape. Both methods will allow you to quickly see any misspelling or grammar mistakes that you may have missed.
How to turn off the spell checker in Word Online
You can also disable the spell check feature in Word online.
To turn off the spell checker in Word online:
- Start by sign up and open your document.
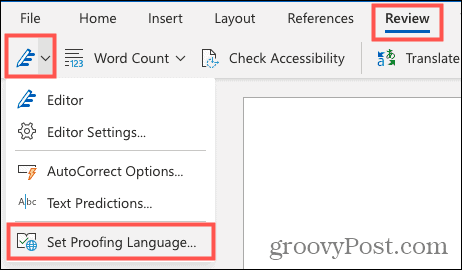
- Go to the tab Revision.
- Click the drop-down arrow on the Editor and select Set review language.
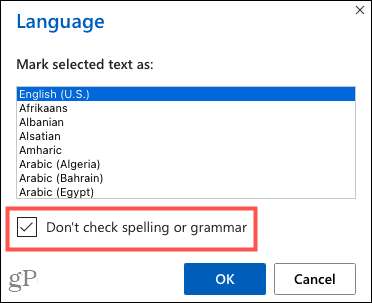
- In the window that appears, check the box Don’t check spelling or grammar.
- Click on To accept.
As you can see, turning off spell checking in Word online also turns off grammar checking by default.
How to manually check for errors in Word Online
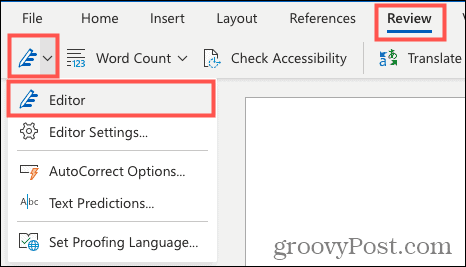
When you’re ready to manually run the spell check on your online Word document, go to the tab Revision, click the drop-down arrow Editor and select Editor.
Use the spell checker when it works for you
Although Word’s automatic spell checking feature is handy, it is not always beneficial to use it as you type. If you get distracted by it, turning off the spell checker is pretty straightforward. Just remember to run the manual spell checker to keep an eye out for any mistakes, especially in the case of professional documents or school assignments.


