
It is better not to store all eggs in one basket but all information on one disk partition. We will tell you how to create partitions on your hard disk (without losing files).
How to create these partition sections? The easiest way to do this is at the stage of assembling the computer and installing Windows. But even if you already have an OS installed and have valuable information on the disk, it is not too late to create partitions. All files can be saved. So how to partition a hard drive on a Windows 10 or earlier computer?
Partitions: what and how many are needed?
Actually, there are no restrictions here. Is that from the point of view of common sense? Much depends on the size of your disk. For example, a terabyte file should not be divided into more than 2 sections. Disks of 2 TB or more can be “cut” by 3. It is only important to understand what they will serve. Here is one of the possible divisions.
- System (from 500 GB) – for the system and software;
- The main one is for storing files, documents;
- Media – for storing movies, photos, videos;
- Games – no comment here.
You shouldn’t make archival partitions on a large HDD – after all, physically, it is one disk. Archives should not be stored in other sections but on another, separate drive.
Too many partitions are also bad – they will most likely be small and quickly start to fill up.
Partitioning disks without losing data.
A typical situation: you bought a computer with an installed OS, celebrated, installed all the necessary software, transferred photos and videos, and then thought: why is there only one section? It’s not too late. You can increase the partition of the disk into virtual parts. Rule # 1: Before doing anything with a hard drive or SSD, create a copy of it (BackUp). If there is too much information, save at least the most important one. To create partitions on an HDD with Windows already installed, you can use a disk partitioning program. More precisely, software that can do this as well. These can be paid or free. Of the latter, we recommend Paragon Backup & Recovery Free.

You can do without third-party software using the available OS capabilities. How to partition a hard drive using Windows? The instructions will not be so difficult.
- Open the “Start” menu and by right-clicking on the “Computer” item, find the “Control” option in the context menu.
- In the window that opens, in the list on the left, select “Disk Management.”
- Right-click on the C: drive area, and then in the context menu that appears – “Shrink Volume.” The system will analyze the disk and suggest the maximum possible size for shrinking the system partition. Specify the compression size so that the C drive is at least 150 GB.
- After the system partition has been compressed, the Not Allocated area appears on the disk. Right-click on it and select “Create Simple Volume” from the context menu. If you want to create one logical disk, then confirm the suggested volume size.
- Looking for two or more sections? Enter your size for the first logical drive to be created. Then confirm the partition formatting – NTFS is suggested by default – and specify the desired drive letter if desired. Do the same with the next remaining area. Click Next and Finish.
How to split the system into two disks when installing Windows?
It is much easier to do this if you have a “fresh” computer on which you are just installing Windows 7, 8 or 10.
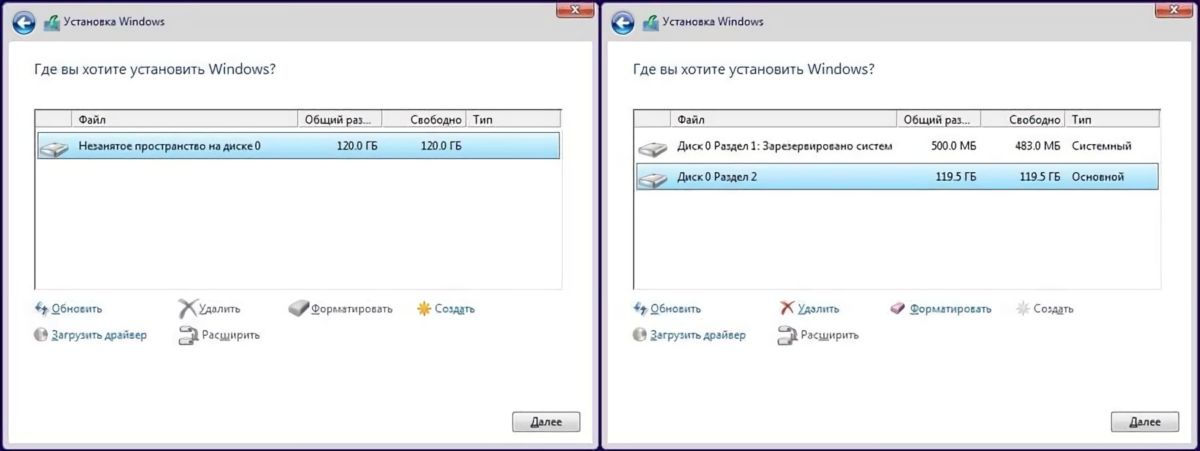
- At the initial stage of the installation, after you select the “Full installation” option, the program will offer to select a hard disk partition to install the OS. Specify the required section and click “Next.” Then click on the “Disk Setup” link. After that, several commands will become available.
- Select New: Create a new partition. Select the unallocated space in the list of partitions, click the “Create” button and enter the megabytes size (better – from 100 GB). Click Apply. When forming the first partition, a partition for boot files will also be automatically created (about 100 MB).
- After the installation is complete and Windows boots for the first time, go to the “Start” menu, right-click on the “Computer” item and select “Control” from the context menu. In the window that opens, go to the “Disk Management” section. Select the “Not allocated” area and repeat step 3 from the advice for option 1. In Windows, you can get only three main partitions that can be bootable – the fourth is created as an additional one.
How to enlarge the system partition without formatting the disk?
Another typical case: your computer already has a disk with several partitions that contain information. However, Windows and programs have grown so much that there is absolutely no free space on the system partition. Do not rush to the store for a new hard drive – there is a way out. Neighboring partitions can be slightly shrunk at the expense of unallocated space and the freed space can be transferred to the file system.
However, before such an operation, we strongly recommend cleaning it from unnecessary files – for example, using the CCleaner utility. Then it only remains to start redistributing space. In Windows 7 and Windows 10, this can be done using standard tools.

- Press the Win and R keys at the same time to open a command prompt.
- Enter “compmgmt.msc” in the line and click “OK.” The Computer Management tab will open.
- On the left, go to Disk Management to view all available disks and their partitions.
- Right-click on the hard drive you want to shrink and select Shrink Volume.

- Now specify how much you want to shrink the section. Logically, a partition size can only be reduced by a value that is no more than the amount of free space on the disk. This means that if you have a 300 GB hard drive and 200 GB of that is occupied, you can compress the partition by 100 GB. Windows will automatically set the maximum value in megabytes.
- Confirm the action by clicking the “OK” button. The section will then be compressed.
After the partition is compressed, the unallocated space is labeled “Not Allocated”. This is what will become the new section.
- Right-click the “Not Allocated” field and select “Create Simple Volume.”
- Follow the instructions in the Create Simple Volume Wizard and specify the new partition’s size and the file system you want to use.
- After that, a new partition will be created and available under the new (assigned by you) drive letter.
You can also use the MiniTool Partition Wizard to partition the disk.

Conveniently, in addition to the program itself, the manufacturer also offers a boot disk image on its Internet resource absolutely free of charge. When installing, do not forget to select the “Configure Settings” item and disable the browser’s installation and extensions to it.
The interface of the utility is quite simple and even basic knowledge of English is enough to perform the necessary operations. Alternatively, you can use another application borrowed from the Linux world- Gparted. The localized interface can be obtained in the OS settings when starting the boot disk.

- After starting the program, select the disk located to the right of the system partition and click on “Move / Resize” in the context menu.
- In the window that appears, drag the mouse on the left edge of the disk space strip and slide it to the right – to the size required to expand the system disk. You can adjust the received volume in the “Unallocated Space Before” field. Click, “OK.”
- Then select the system drive C: and in the context menu again, click on “Move / Resize.” Pull the right edge of the disk space strip all the way to the right. Click, “OK.”
- So you’re done: to expand your C: system partition. Click on the “Apply” icon in the top menu. If a lot of information has been accumulated in the sections, then the process can be lengthy – make sure that the computer power is not turned off.


